 I’m a leetle bit excited to announce Ada Spragg will now be collaborating with Britex Fabrics which means from time to time, I’ll be guest posting alongside a whole bunch of talented sewista’s. This week, I shared a pure-inspiration post to DIY yourself a pair of gourmet pleated silk pants. And hopefully to take some of the fear out of sewing silk, especially the ones with bad reputations, like silk charmeuse. As this is a sponsored post, Britex provided this jaw-droppingly beautiful ‘gleaming emerald green silk charmeuse‘ from their selection of silk solid fabrics (now on sale). I’ve been wanting to sew a pair of pants like this, with pleated details and a tapered leg forever. When Style Arc recently released the Antoinette pants pattern complete with pleats, hidden pockets, invisible back zipper and that elongating leg, I knew it was the one!
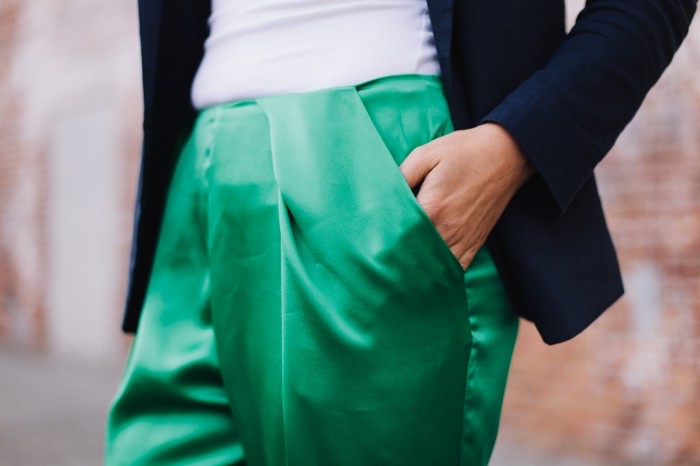 Let’s talk about Silk-o-Phobia, because it’s out there and it’s real. Having never sewn silk charmeuse before, I was quietly fretting about the fact that my first attempt was going to be a pair of pants with pleats & zippers & facings (go hard or go home, right?!). Would the silk be slippery and hard to pin and sew? Would it like being pressed into pleats and folds? How would silk charmeuse handle an invisible zipper? How would I handle silk charmeuse if it didn’t handle invisible zipper? All questions you might be asking yourself too before sewing with silk. Well, I’m pleased to report, without any special silk-handling talents, we made it. First of all, the silk charmeuse was a lot easier to manoeuvre than I expected. I imagined it would have the weight of a silk satin, but it’s super light weight and quite delicate. Being silky like satin on the right side, I thought it be would slippery and awful to work with but it pinned, sewed and pressed totally fine.
 The only issue I ran into was with the easiest part of the garment: the leg side seams. I was like after I sewed them (with a fine needle and regular straight stitch in case you’re wondering) the seams were quite tight, almost puckering. I’m still not entirely sure what the problem was. Maybe because I was using a generous 6/8″ french seam (instead of suggested 3/8″ allowance) in attempt to get a closer fit since they were slightly too big after the first try-on. And because of the shape of the leg pattern pieces, which lie diagonally on the fabric (not quite on the bias) it may have changed the fit and shape of the leg pieces slightly. Hmm, not suresies but it’s not a biggie, I pressed and stretched the seams, and pressed again which released some of this extra tension.
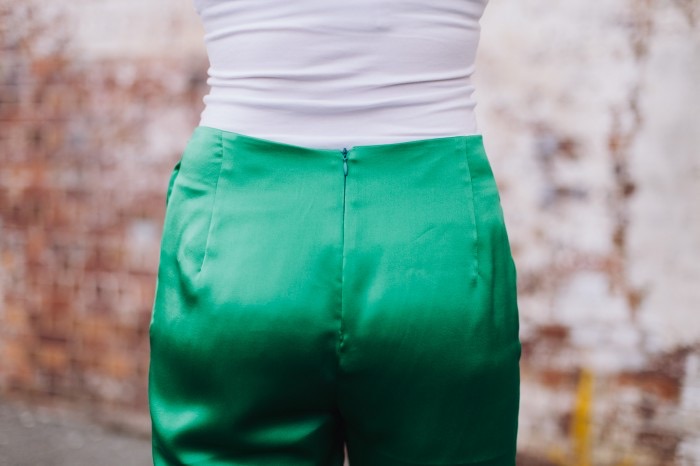
 Being silk charmeuse, I had a hunch that the only way it and the invisible zipper were going to get along was the area had some extra reinforcement. I cut two narrow strips of fusible interfacing and added them to the seam allowance where the zipper was inserted, which worked beautifully and is a good tip to remember. As for the fit, well I mentioned I tried to take them in a little by eating up extra fabric from the side seams with french seams. I measured a size 10 and bought the size 10…Style Arc only sell individual sizes, which you pay the same price for as you would for a pattern with all sizes included. Make of it what you will but if you were to get into the habit of ordering the wrong size pattern as I did once or twice, then it starts to add up. Style Arc were totally accommodating and sent me the correct size on one of these occasions, even though the mistake was on my part (when the sizing gamble goes bad) but the other time I was just too embarrassed and copped another round of pattern and postage $. So, where all this is going is, the 10 is a fraction too roomy but I have a feeling the 8 would be too small. They’re meant to sit on the waist, but even after my strategic French seaming, they’ve ended up sitting just below waist. However, the crotch depth and leg length are spot-on so I don’t think I’d dare order the 8, but next time would have to take them in further.
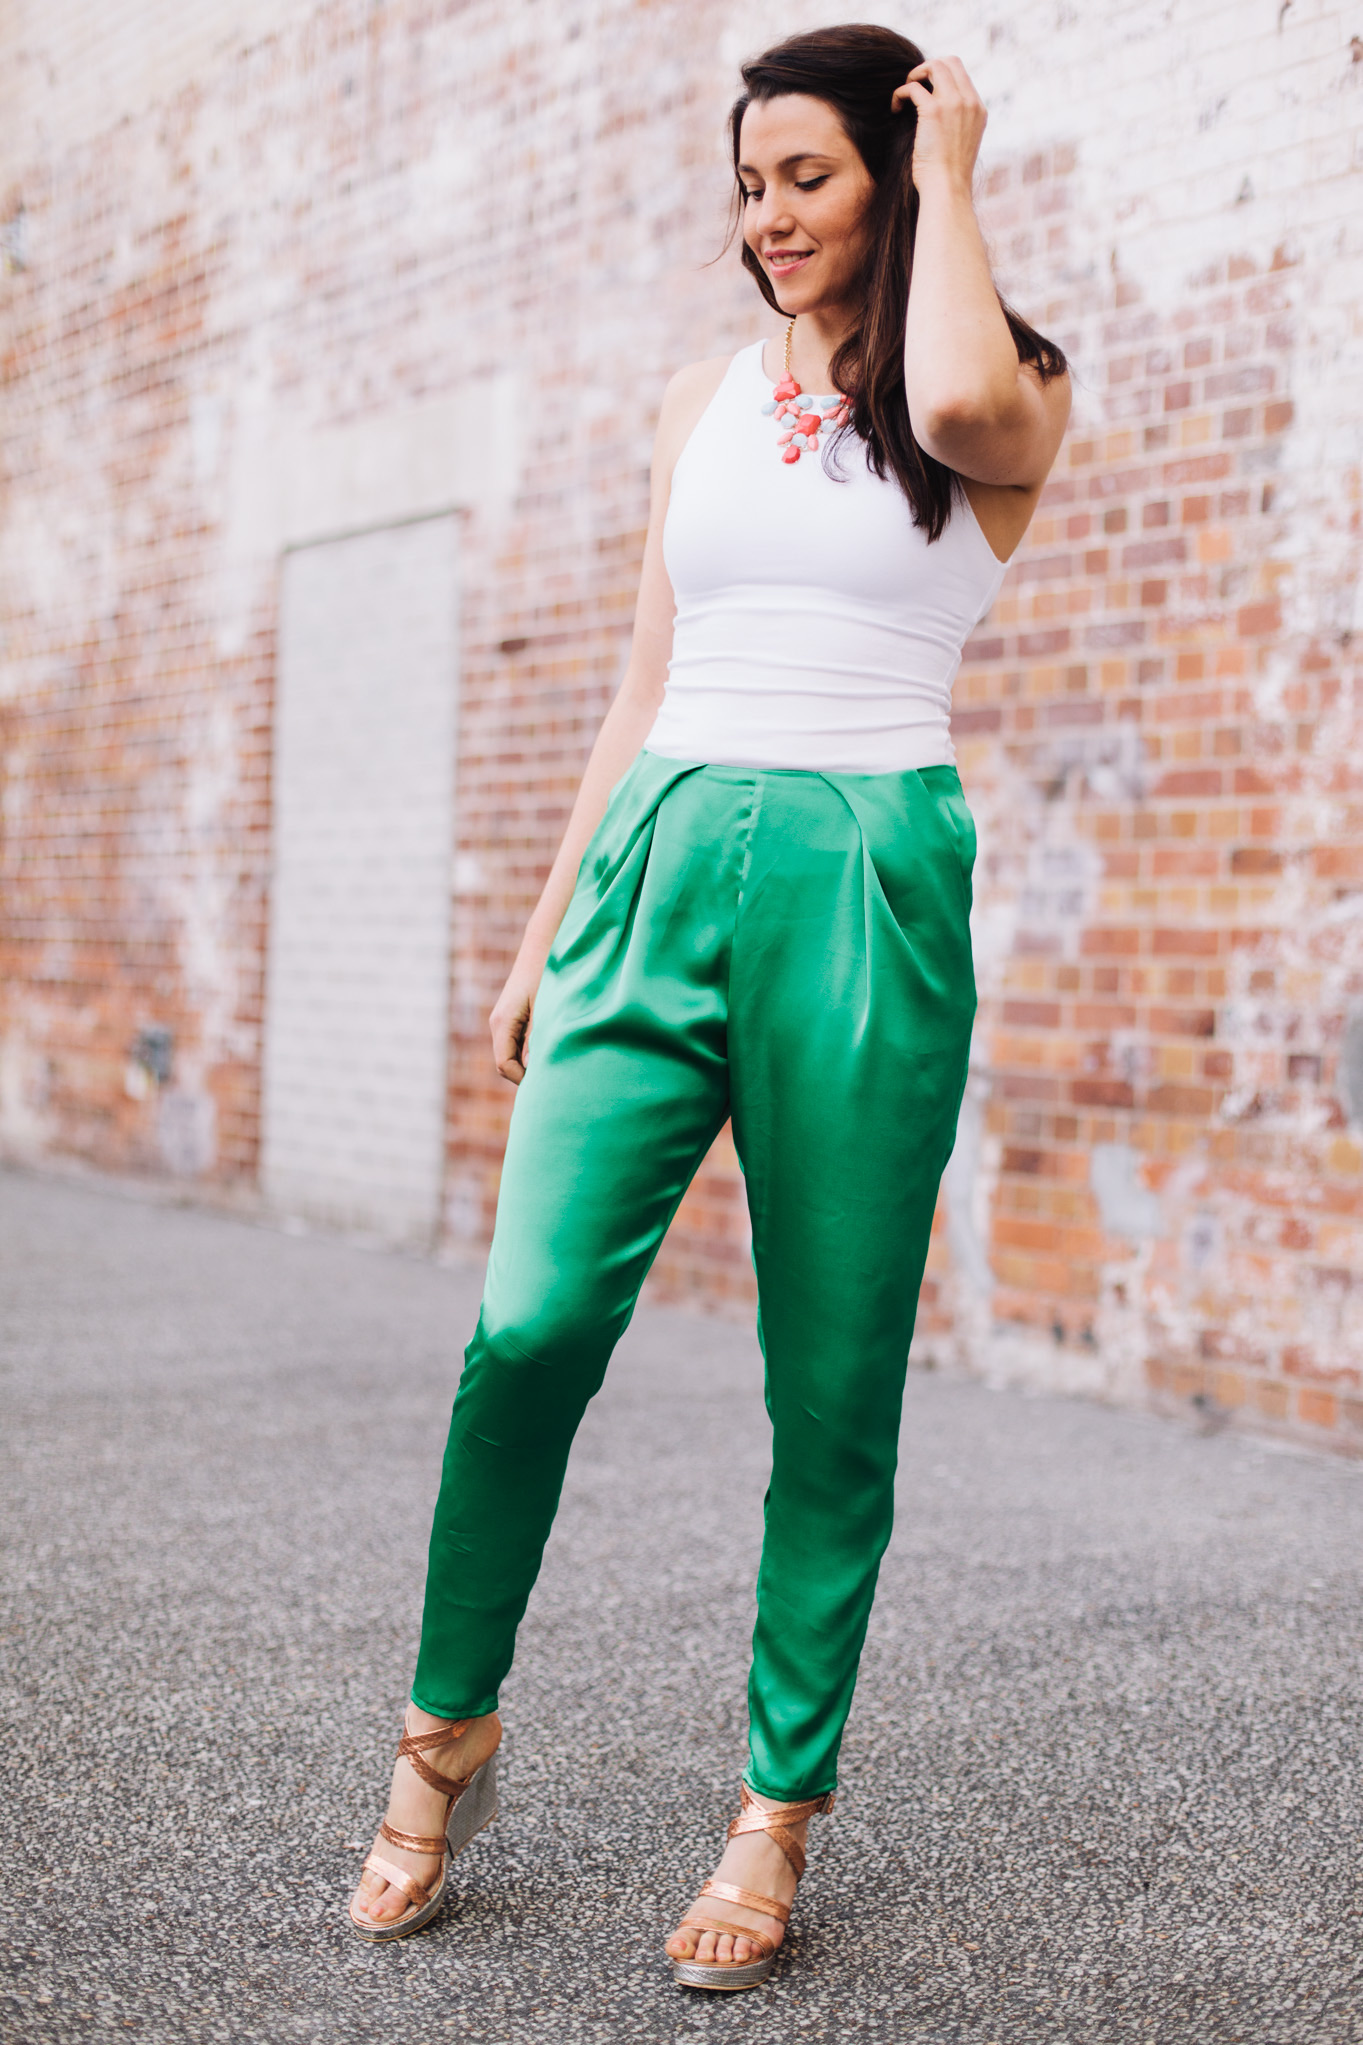 Construction wise, I just shut my eyes and plunged into the pleated section, which is made up of not one but TWO pleats: an inverted pleat and a knife pleat. A who-da-what pleat? Yep, my thoughts exactly. But Style Arc very kindly added a couple of extra diagrams to the (normally sparse) instructions this time, which made it all very user friendly and quite pain free. To mark the pleats in the charmeuse, I stabilised the area with extra pins which helped the fabric stay on grain. It probably would have been easier had I not been using broken off chunks of tailors chalk but my chalk pencil wasn’t leaving a strong enough mark. I ended up squinting hard at the pattern illustration to see if the main knife pleat was meant to be pressed in place or just left to drape. The markings on the pattern are kind of like a huge dart which would have indicated that you would press. I tried it with one side and it looked kind of fugly so I smooshed (technical term) it back flat and left the other side alone.
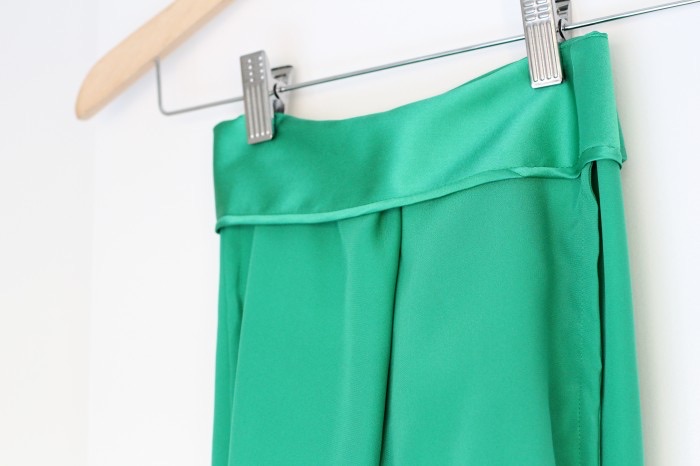
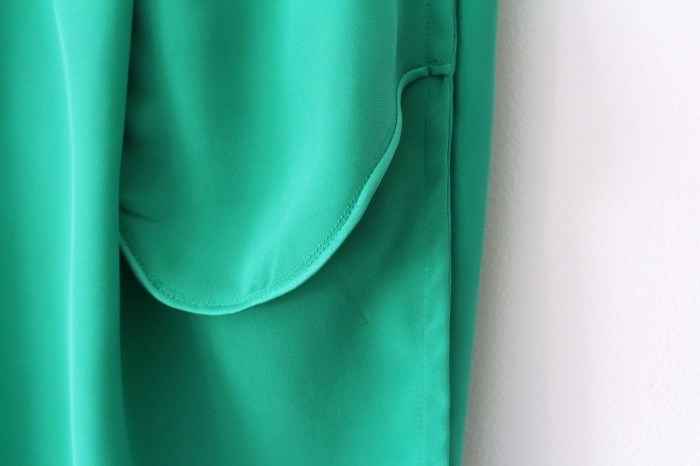 To honour this dreamboat fabric and give it the royal treatment it deserves, I knew it needed to have as good looking innards as the outside. French seams are one of those techniques I used to avoid like the plague but Jen’s tutorial took all the fear out and now I use them whenever possible. Yes, they absolutely do take longer but if you’ve got a fabric that’s co-operating, they are actually fun / satisfying and worth the extra time for super lush finish on special projects.I also relish being able to sew a whole garment up on one machine for a change! Along the same ilk, I finished the seams of the pockets and waist-band with some self-made bias binding, another simple technique that can add that special something to your hand-makes.
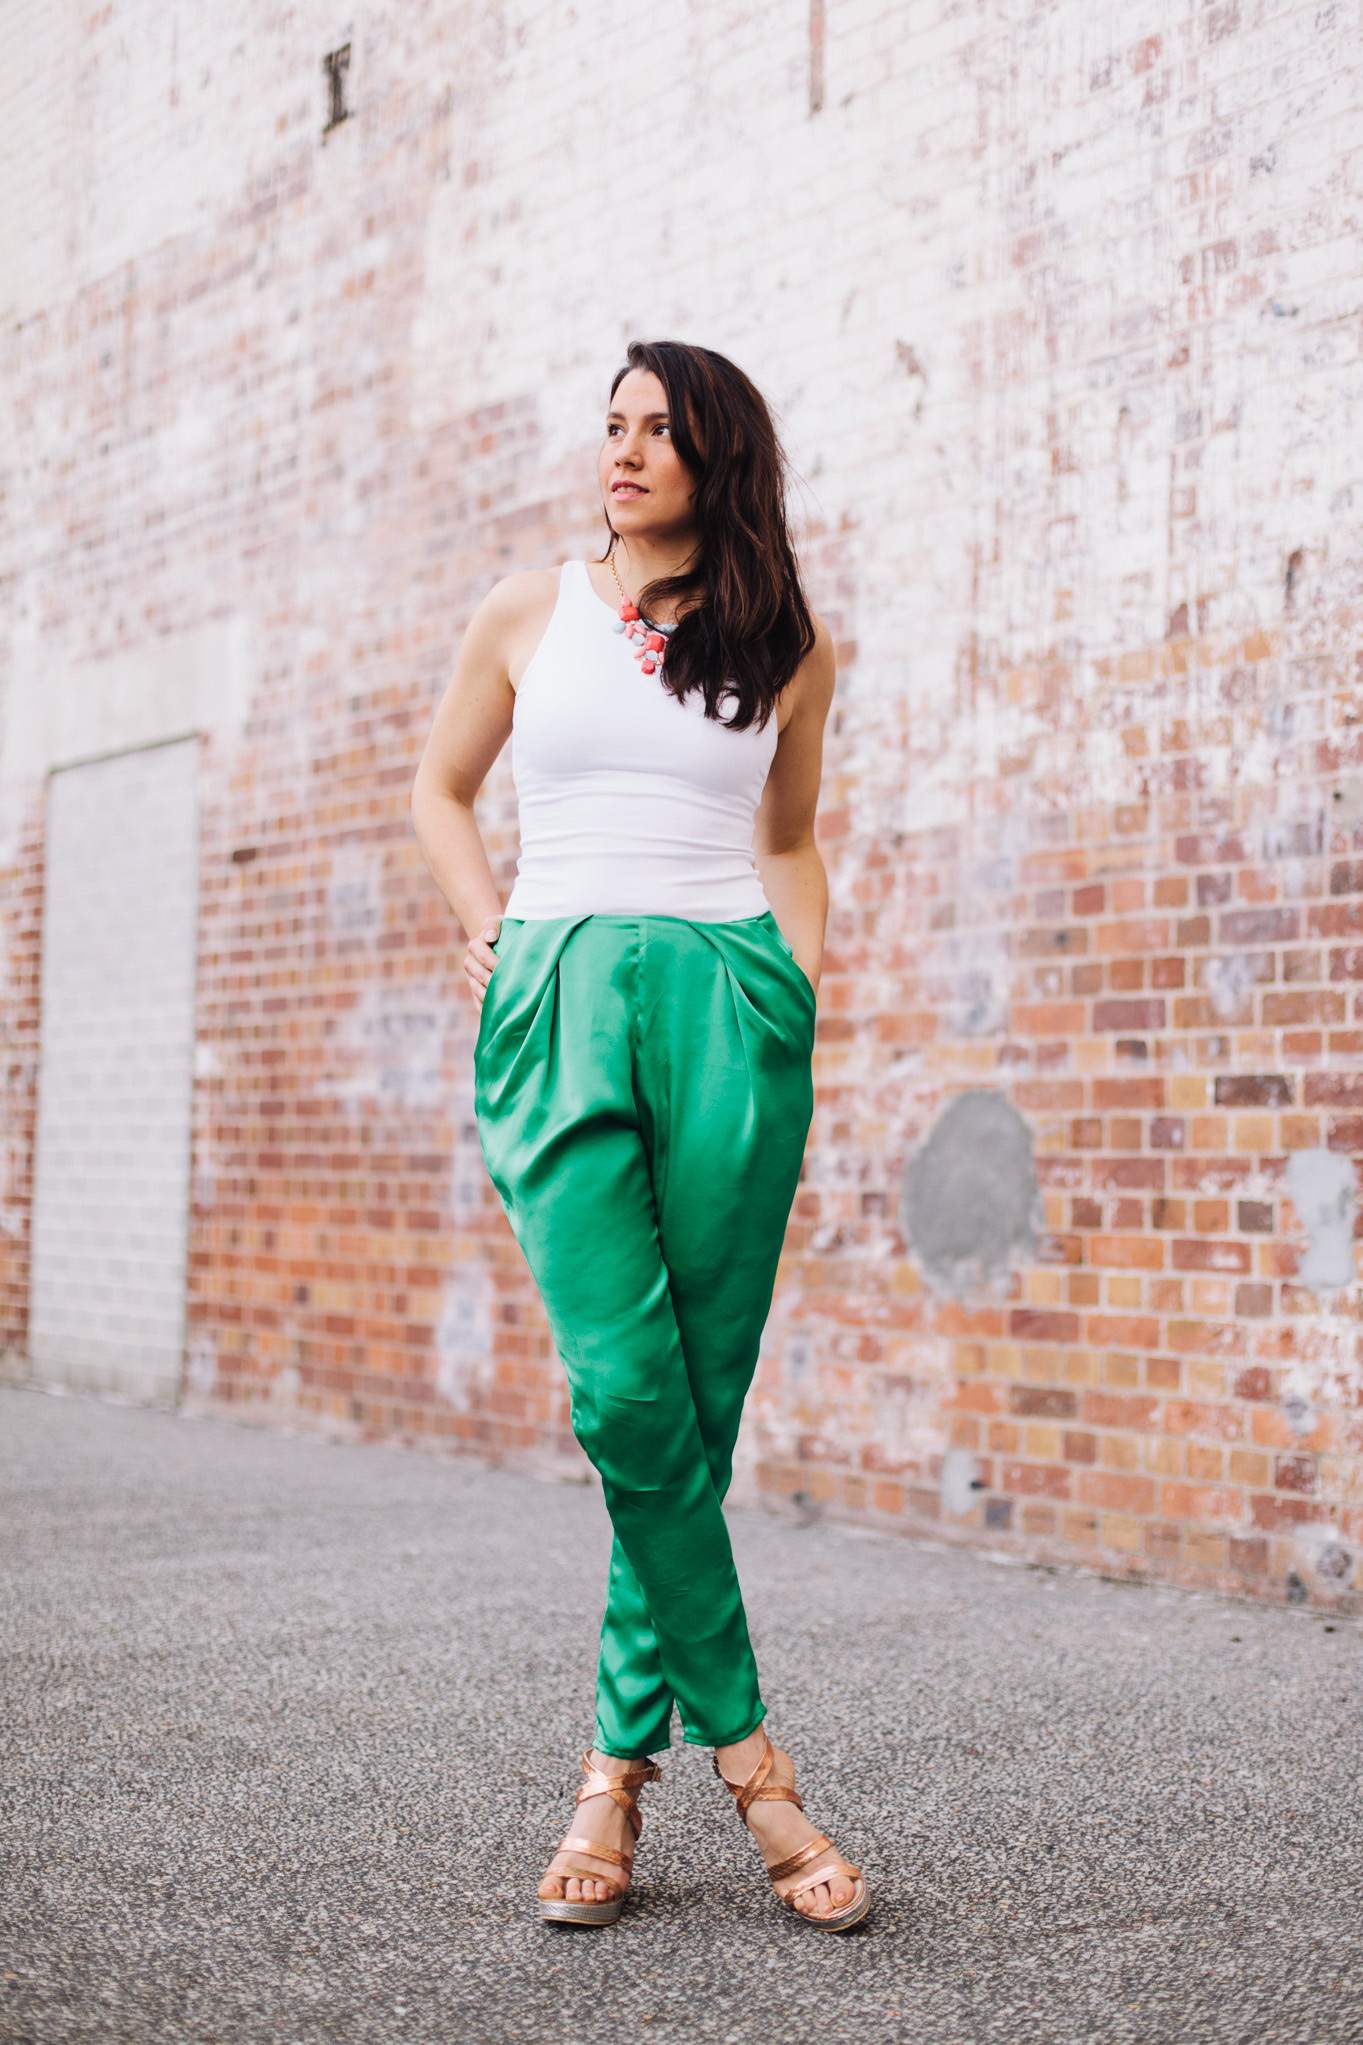 I loved this pattern so much, it’s now back in the queue to sew up in a print (hello you pretty ikat silk, you) or another solid for everyday wear, which trust me, is not as glamorous as these pants would have you believe. Overall, they’re not perfect but I am immensely proud of them as a first attempt at charmeuse and pleated pants!
S.E.W.N.
09/08/2014
DIY Pleated Silk Pants // Ada Spragg + Britex Fabrics
05/08/2014
Shorts On The Line // Two Piece + Giveaway – closed
 It’s that time of year again! Shorts on The Line time! I’m mucho exited to be taking part once again in this month-of-shorts-appreciation hosted annually by Imagine Gnats and Small and Friendly. Today I’m sharing some shortspiration, which um, as you can see has turned into two-piece setspiration too. Now I, for one, am never shy of an excuse to sew shorts, however if you’d like to get involved and make yourself a pair, all the incentive you need is right here in the massive list of prizes (read: fabric $$$) up for grabs in the Shorts on the Line competition. Alternatively, if you’re a lover not a fighter, just make yourself some damn shorts and share them on Kollabora!
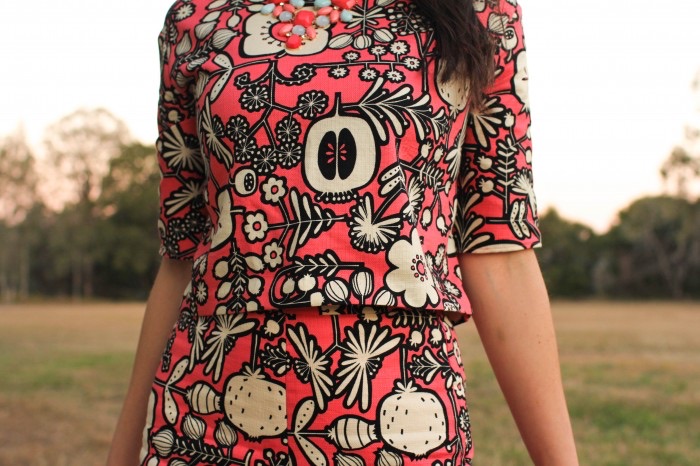
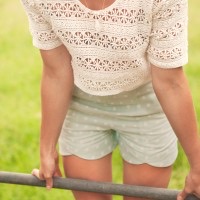
 As 2014 is the year of finding and sewing the ‘perfect pair’, my list of ‘shorts to sew’ is a long and winding one. And a growing one. Just recently Tessuti Fabrics released their first shorts pattern, the Esther shorts, which they describe as a ‘classic, vintage-style’ pattern with a high waist, invisible side zipper and narrow waistband. All I heard was something something, invisible side zipper, something something. Invisible side zippers are good stuff! With no extra bulk being added by a fly front, they make for a super streamlined and flattering fit and are my favourite way to enter and exit a pair of shorts or pants. I was sold, even before Tessuti offered up a copy of their Esther shorts pattern for review, along with a choice of some short worthy fabric from their eye-poppingly gorgeous selection…see confetti print, triangle print and beach scene bombshell fabric. Oh, and because the ladies at Tessuti are mucho generous and just generally awesome, they threw in an extra hard copy of the Esther shorts pattern for someone special! Which is all of you so I’m turning it over to Ronnie the random number generator. If you’d like to win, leave a comment and this time maybe tell me what you ate for breakfast (last time was lunch) and I’ll announce the winner on Friday.
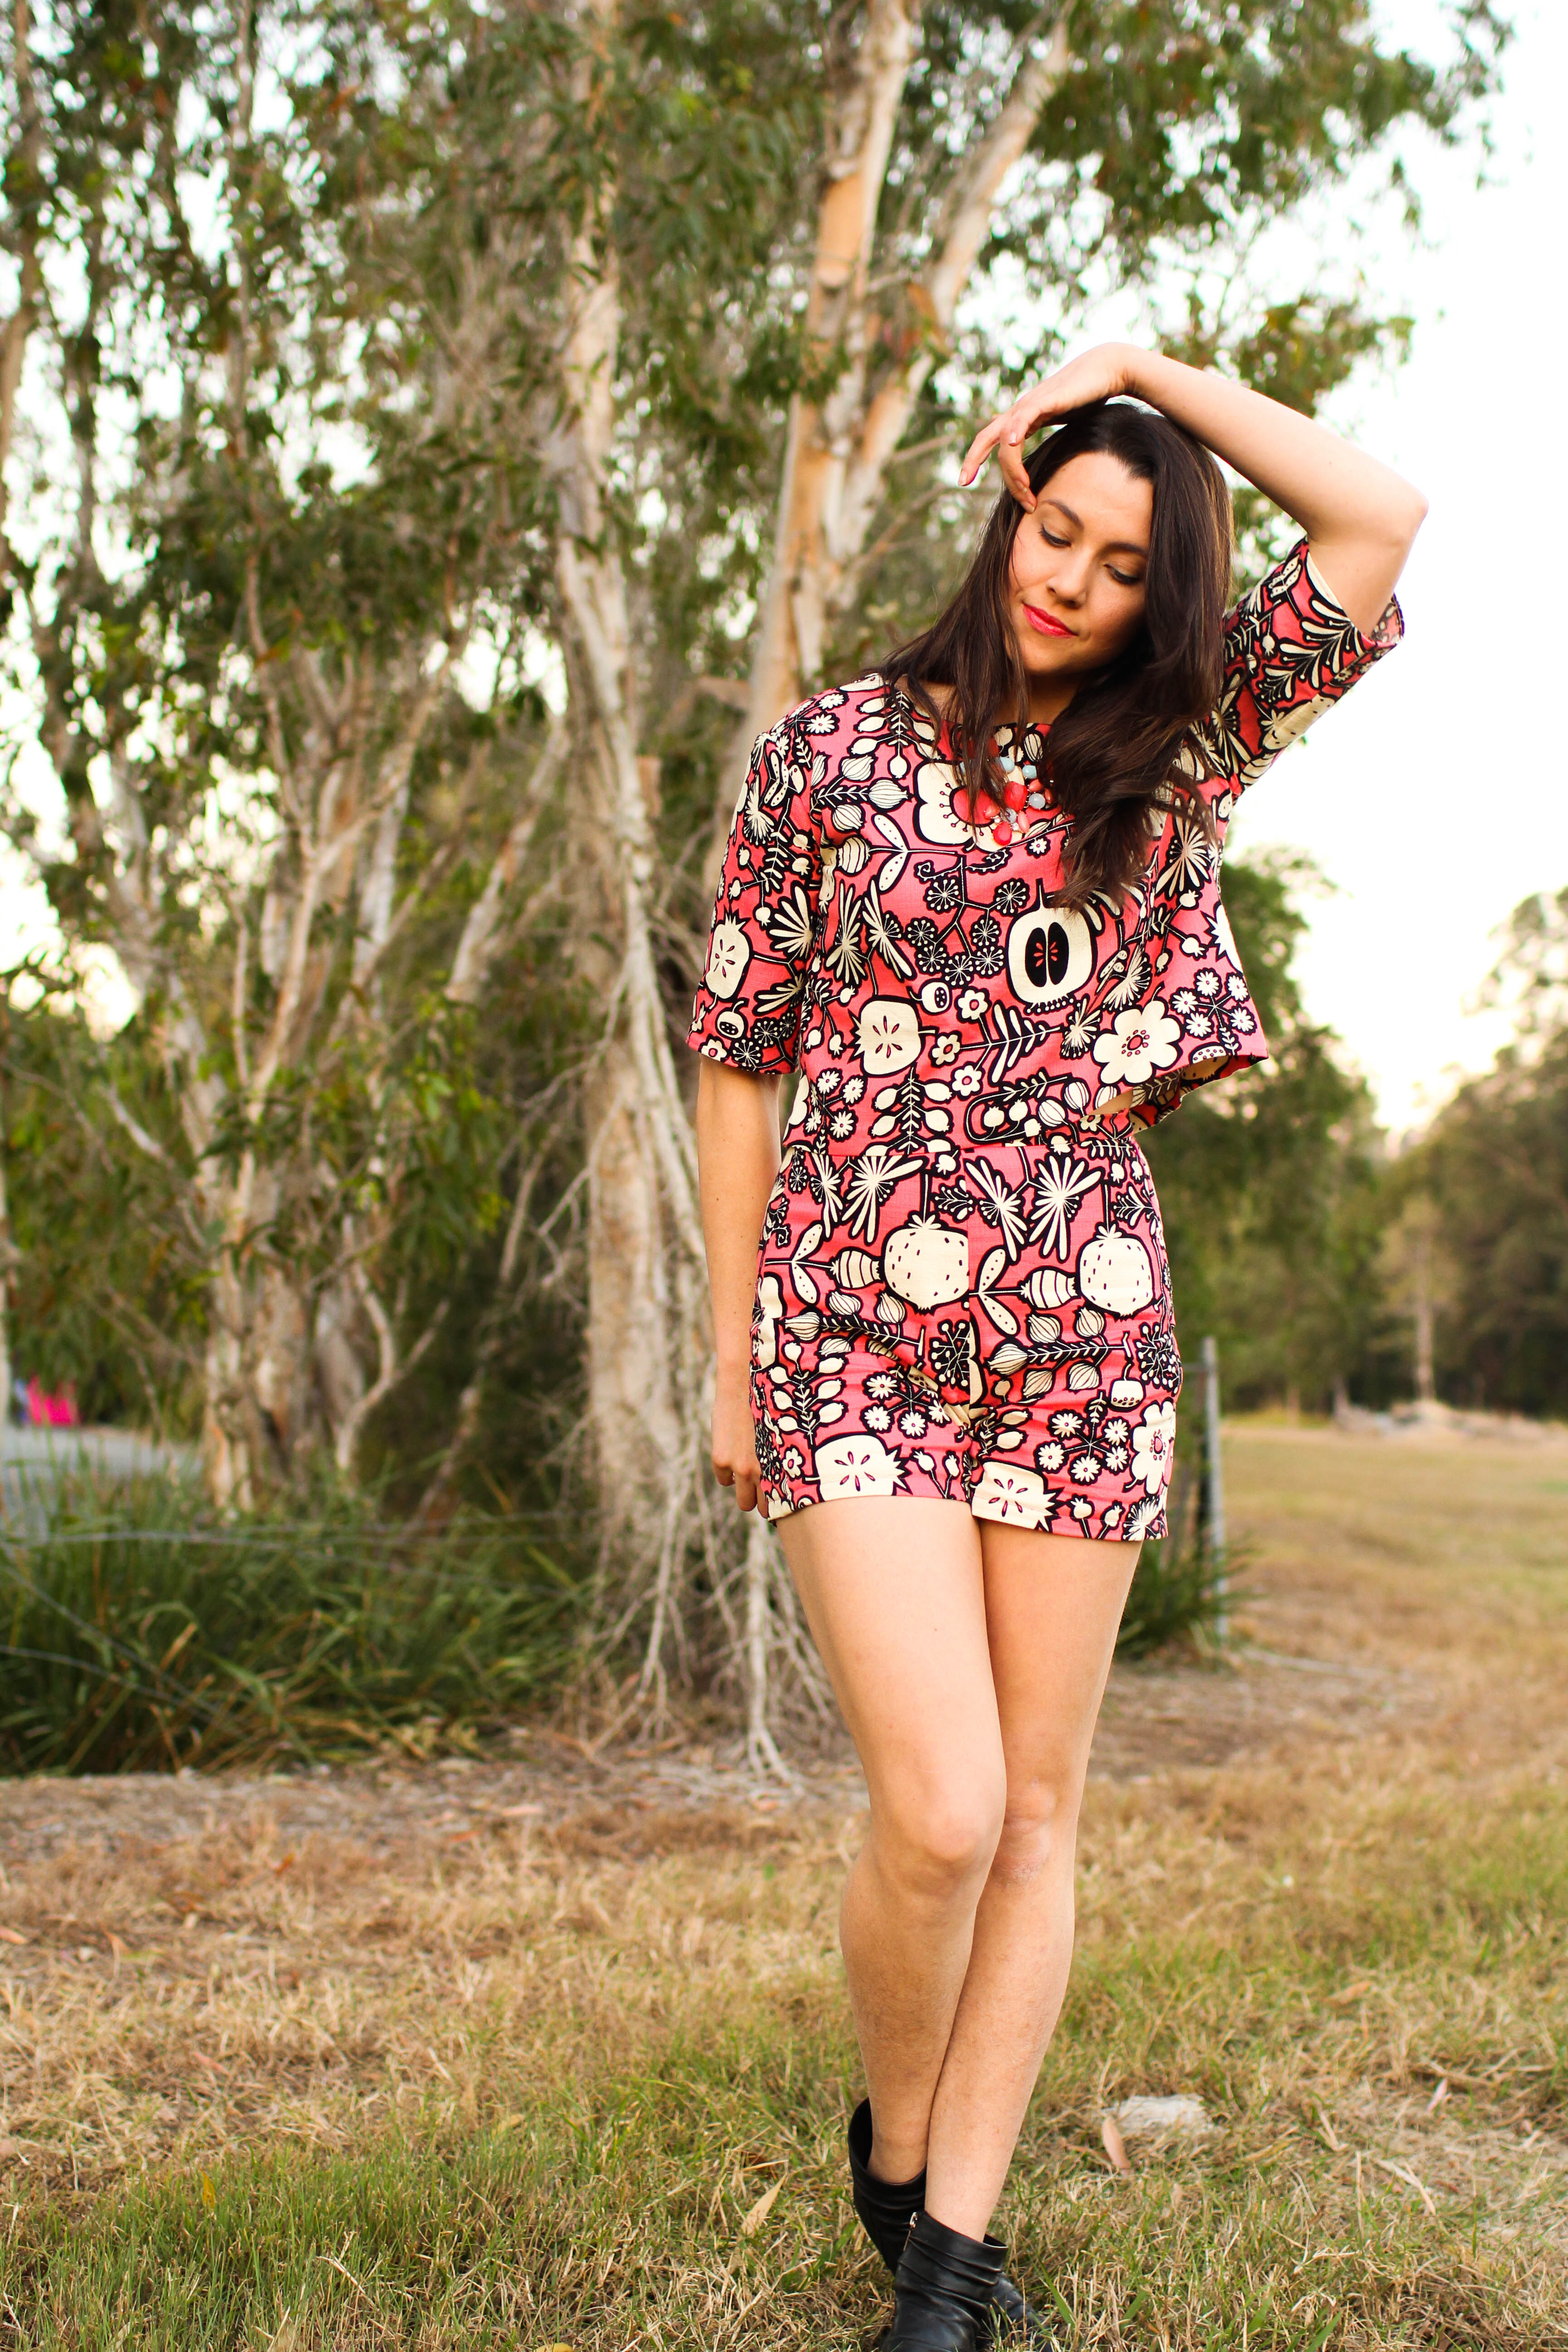
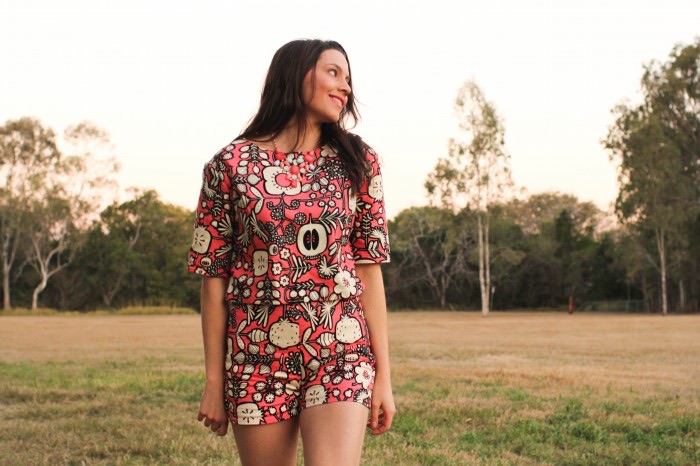
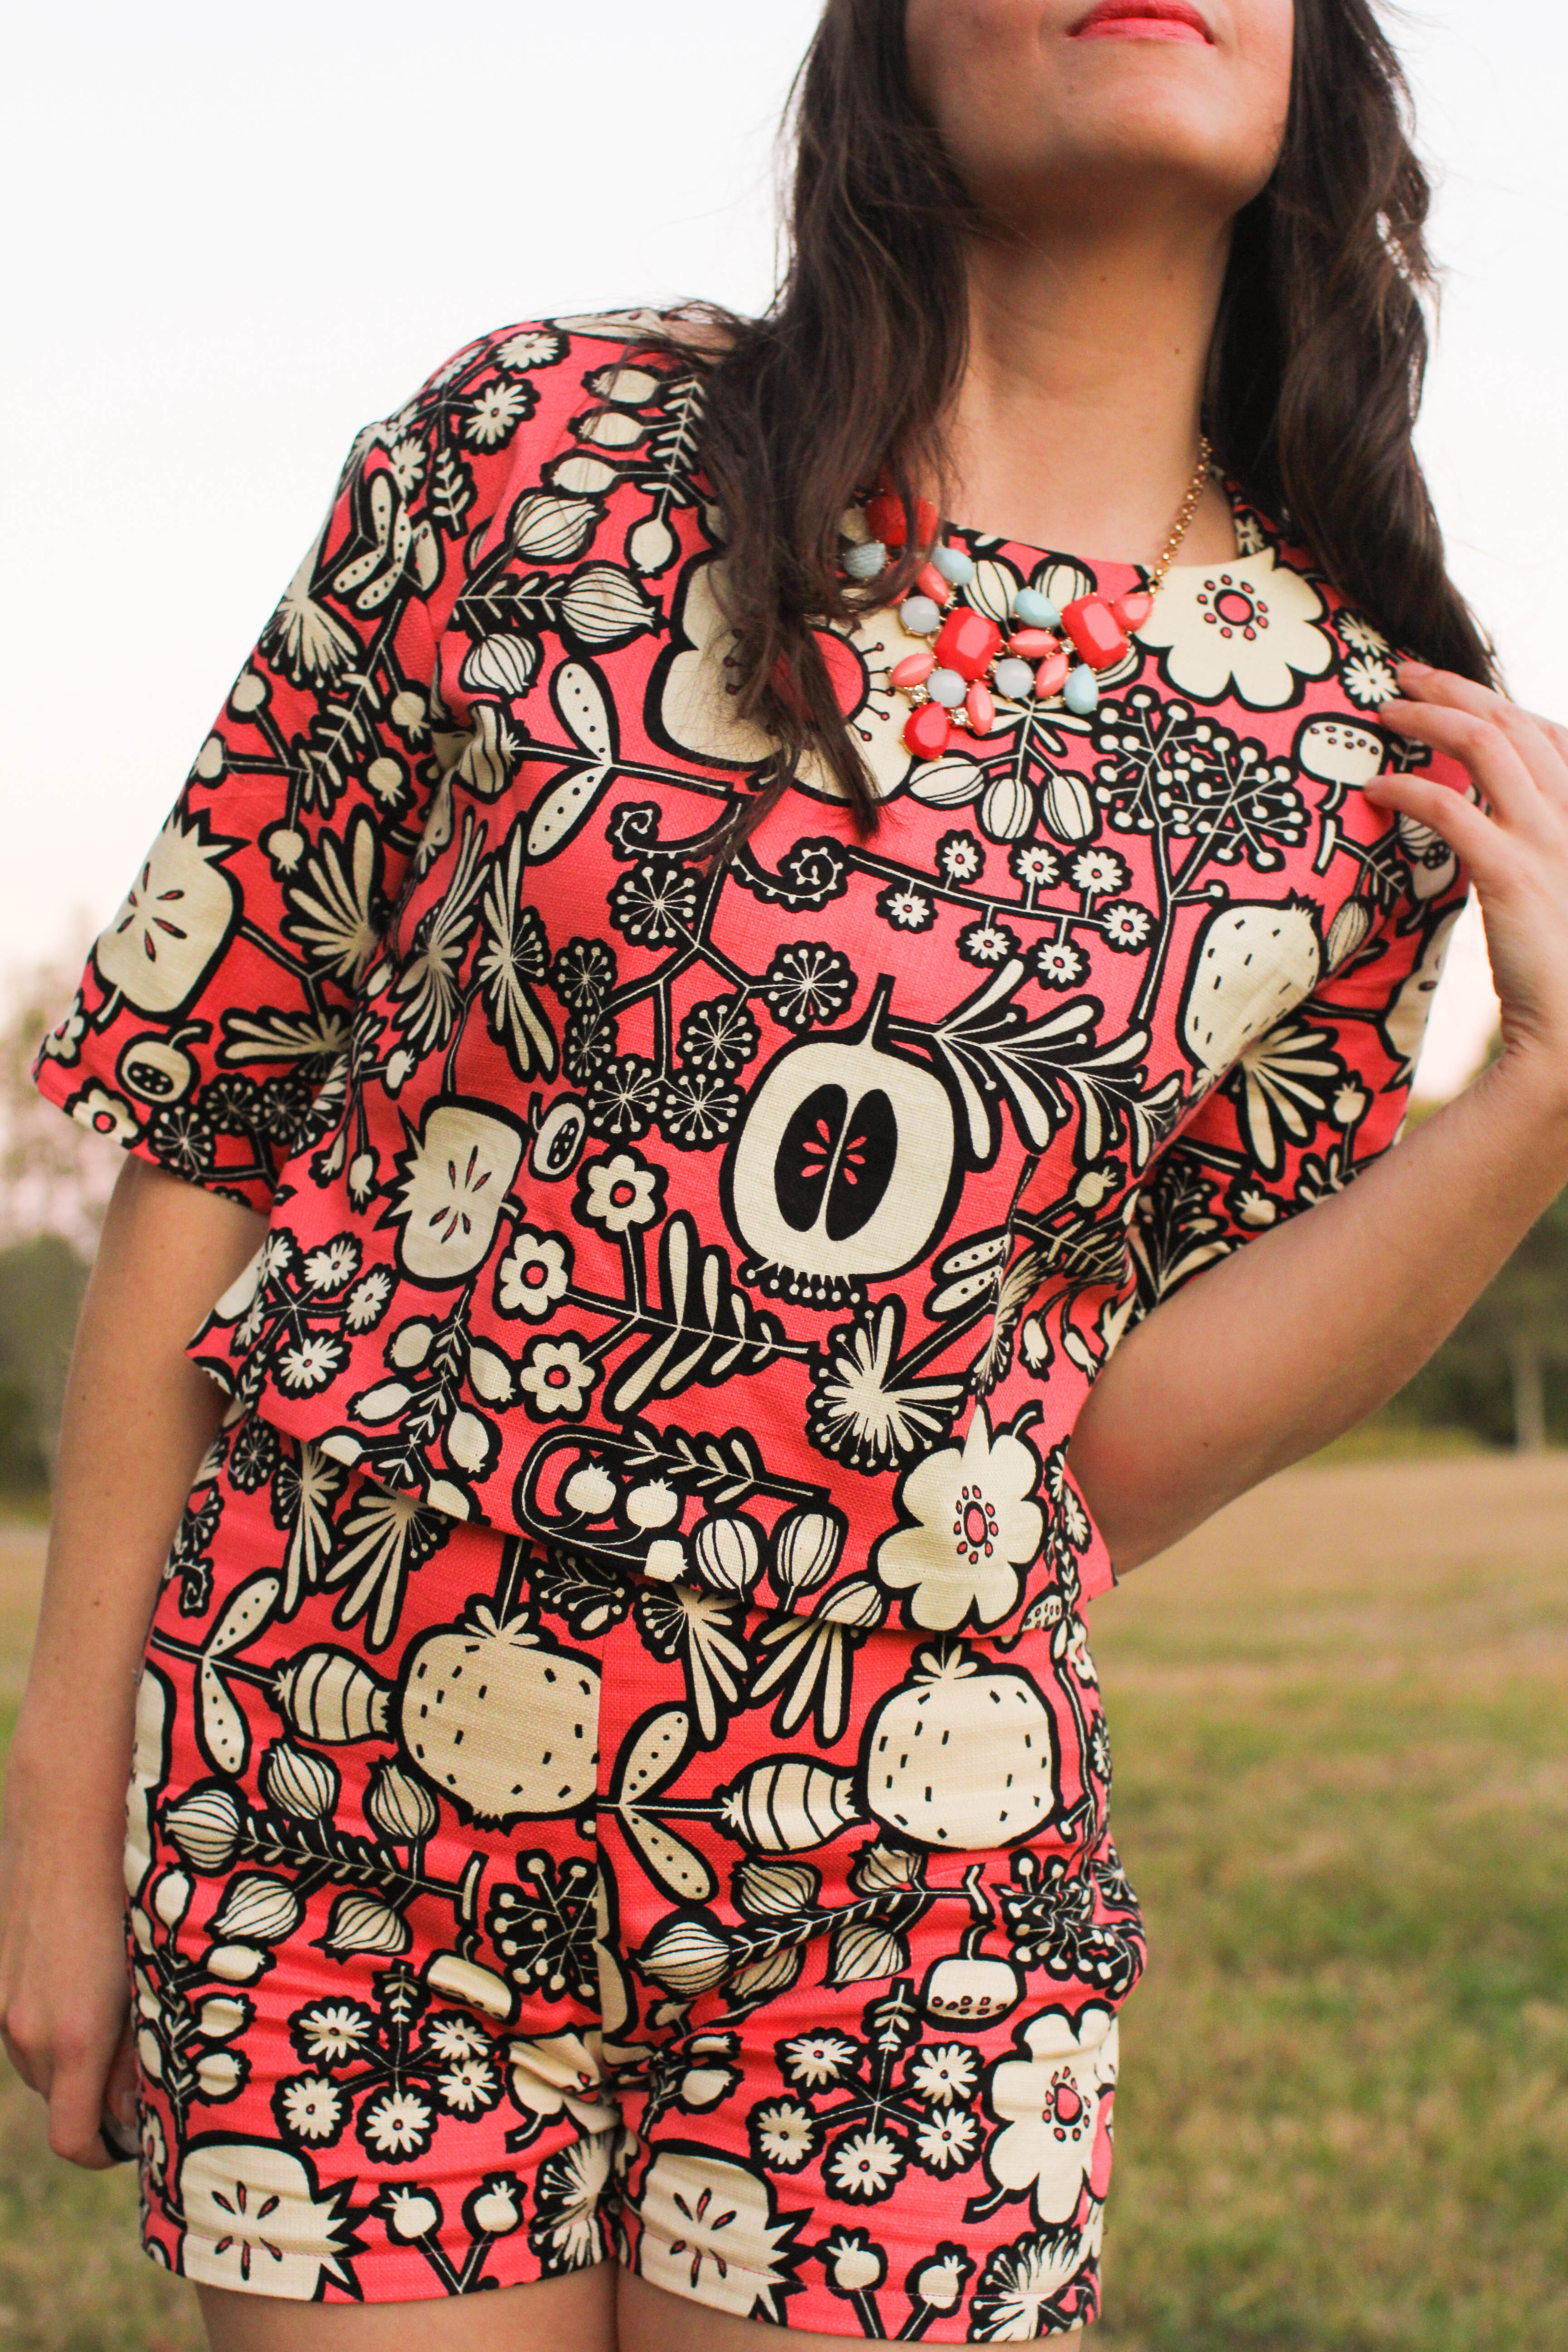
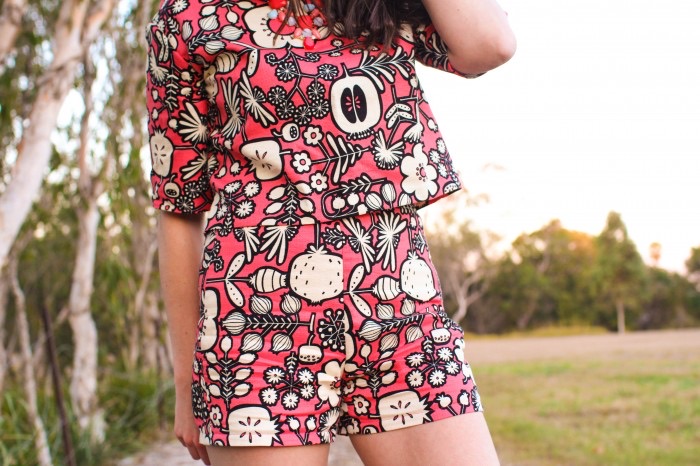
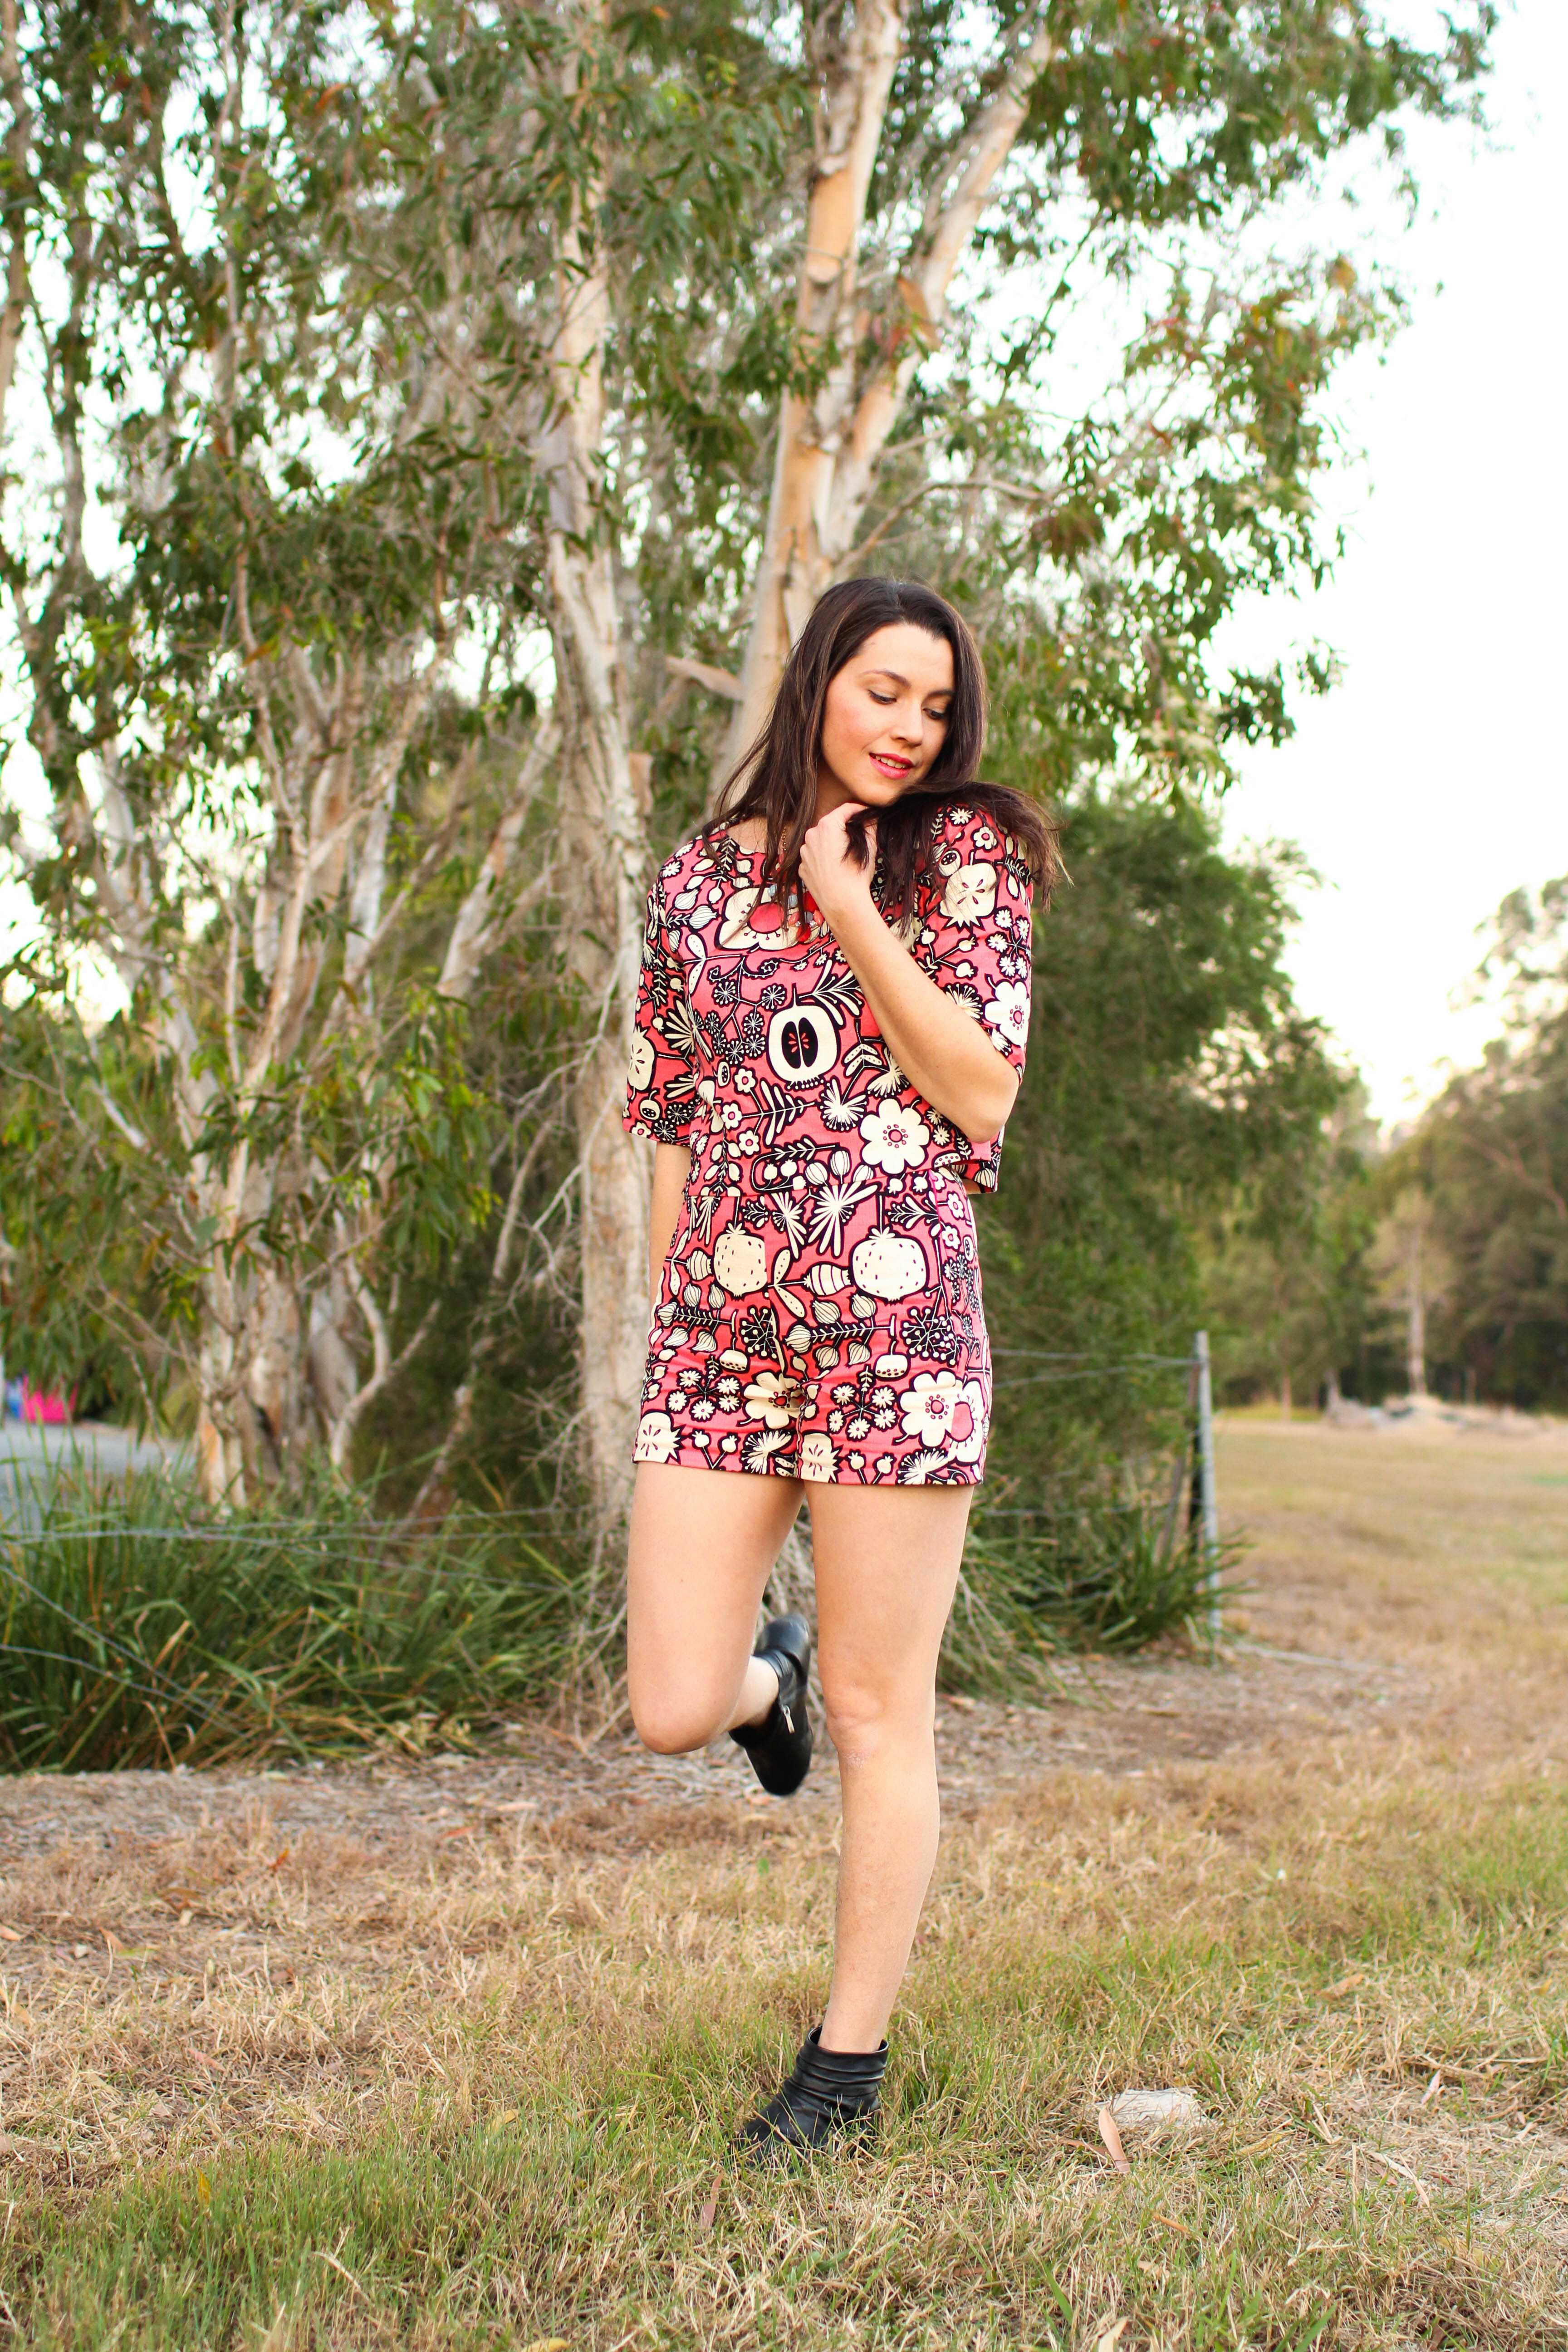
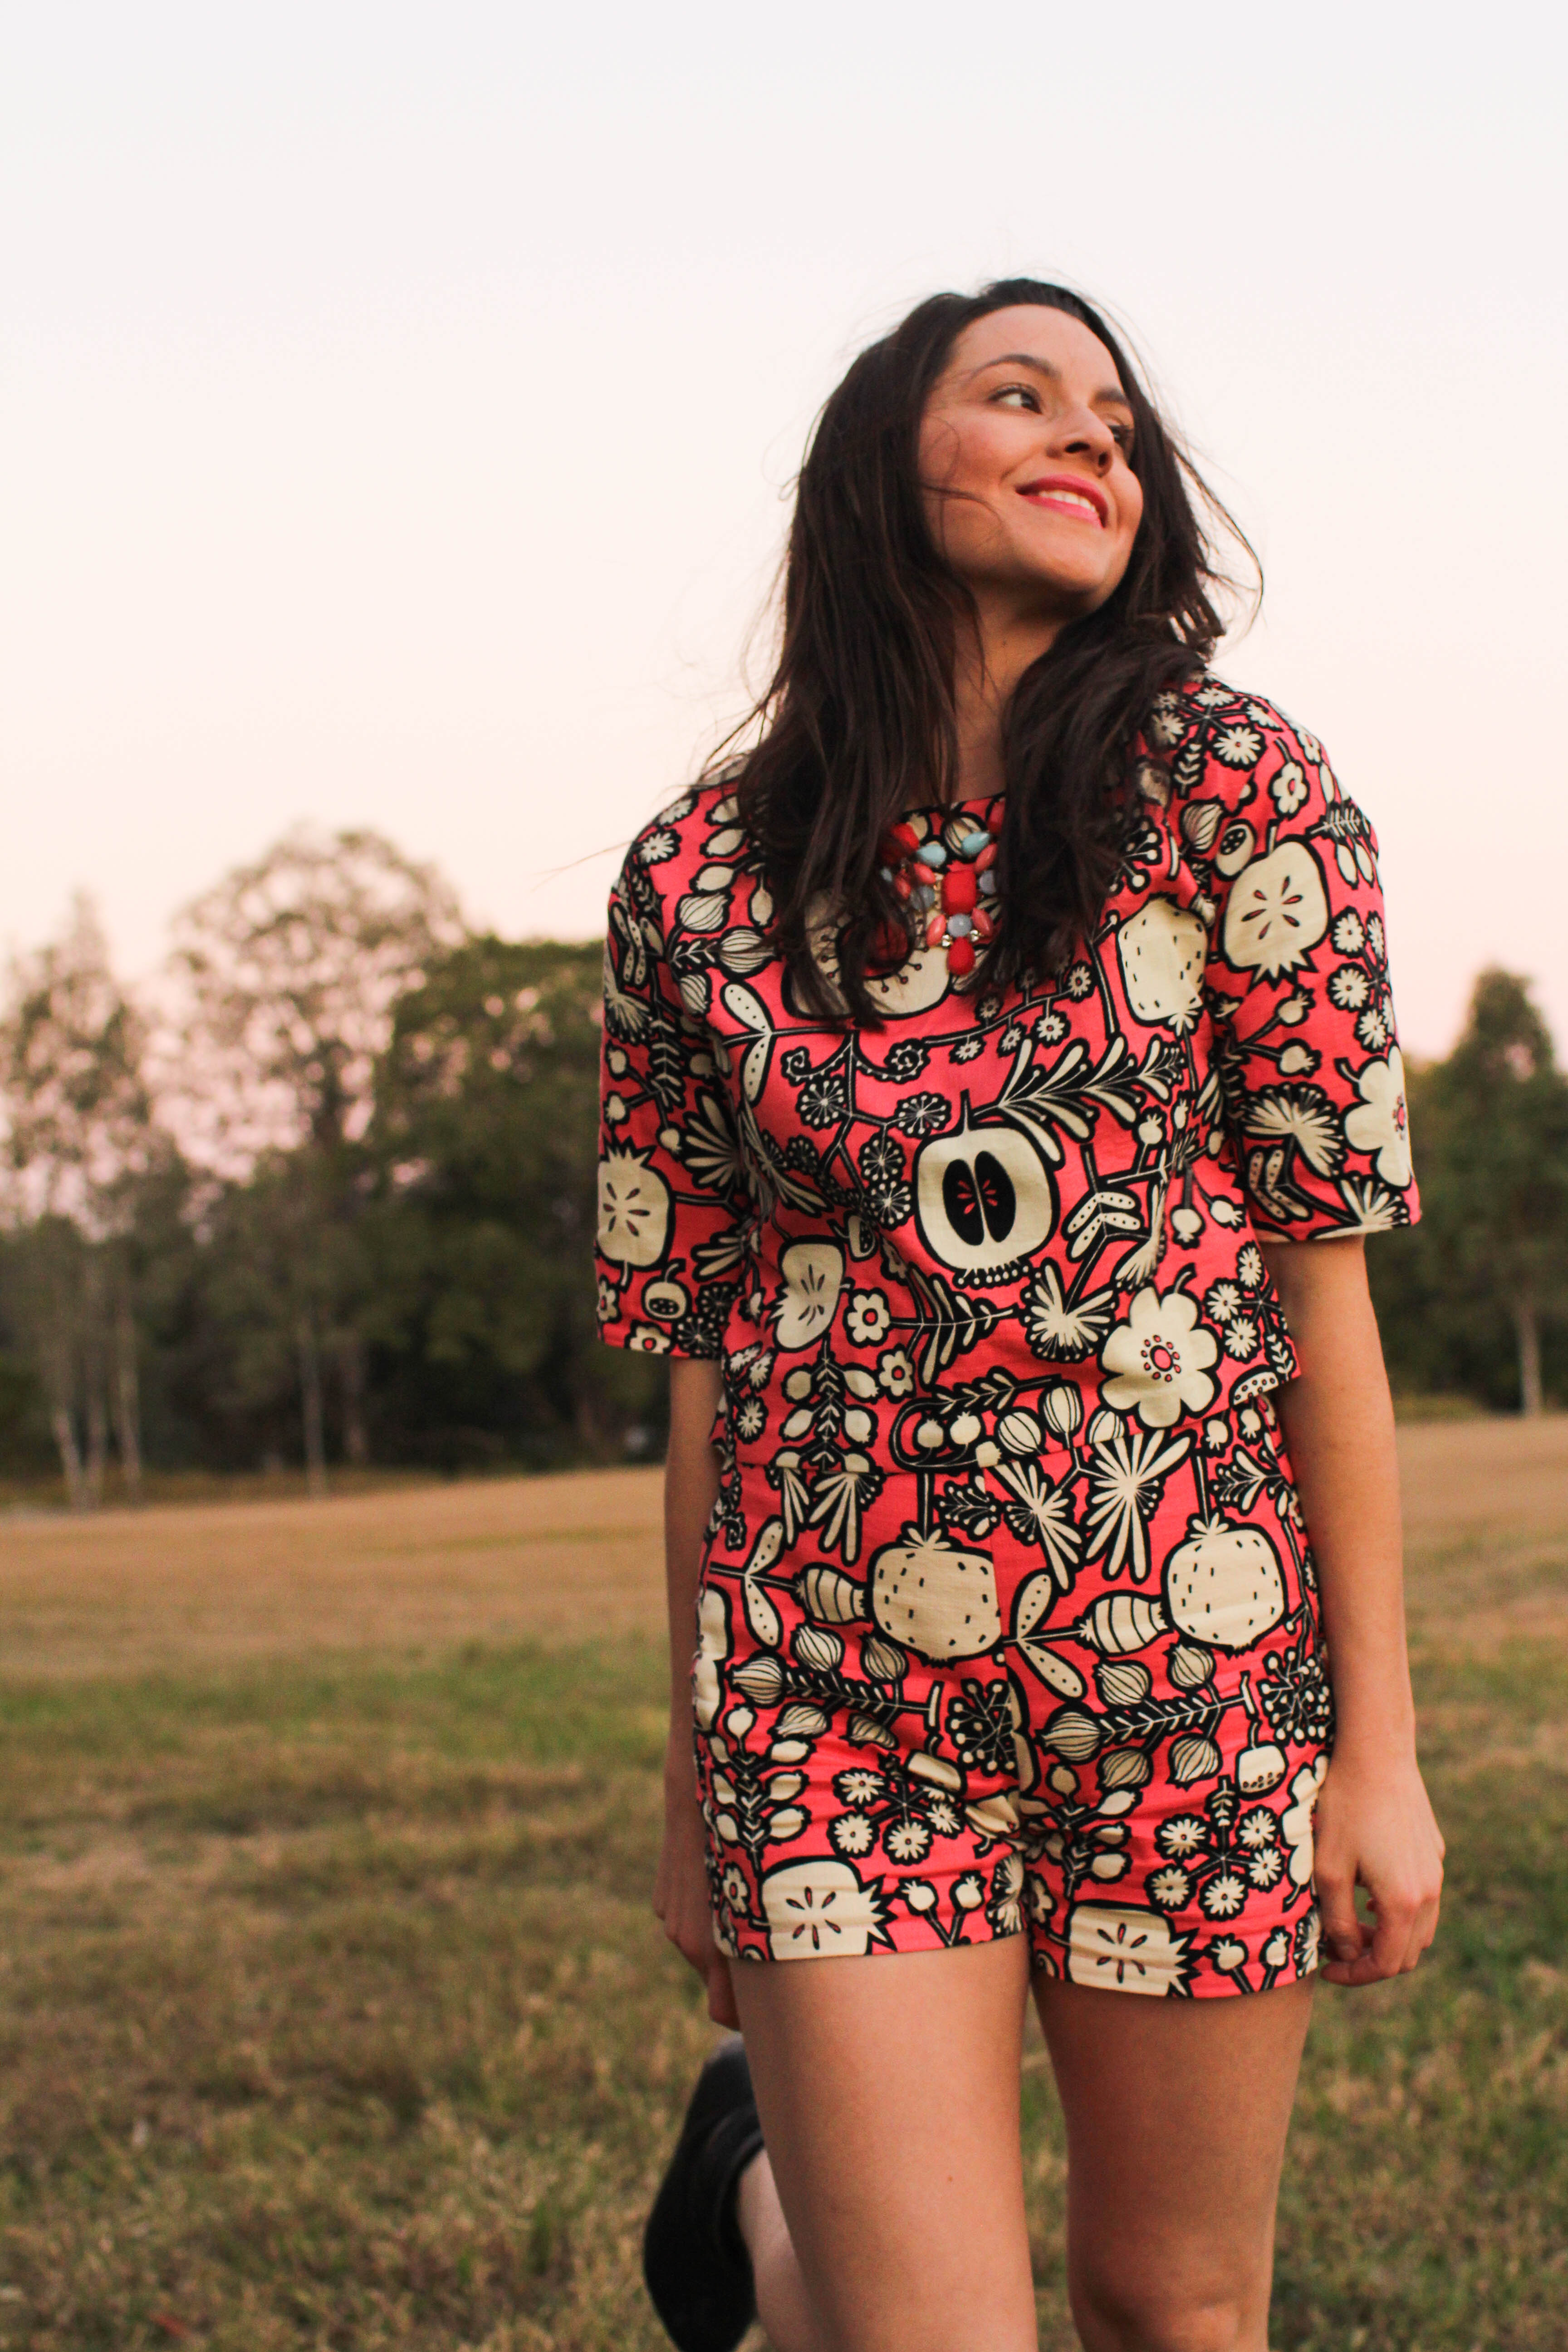
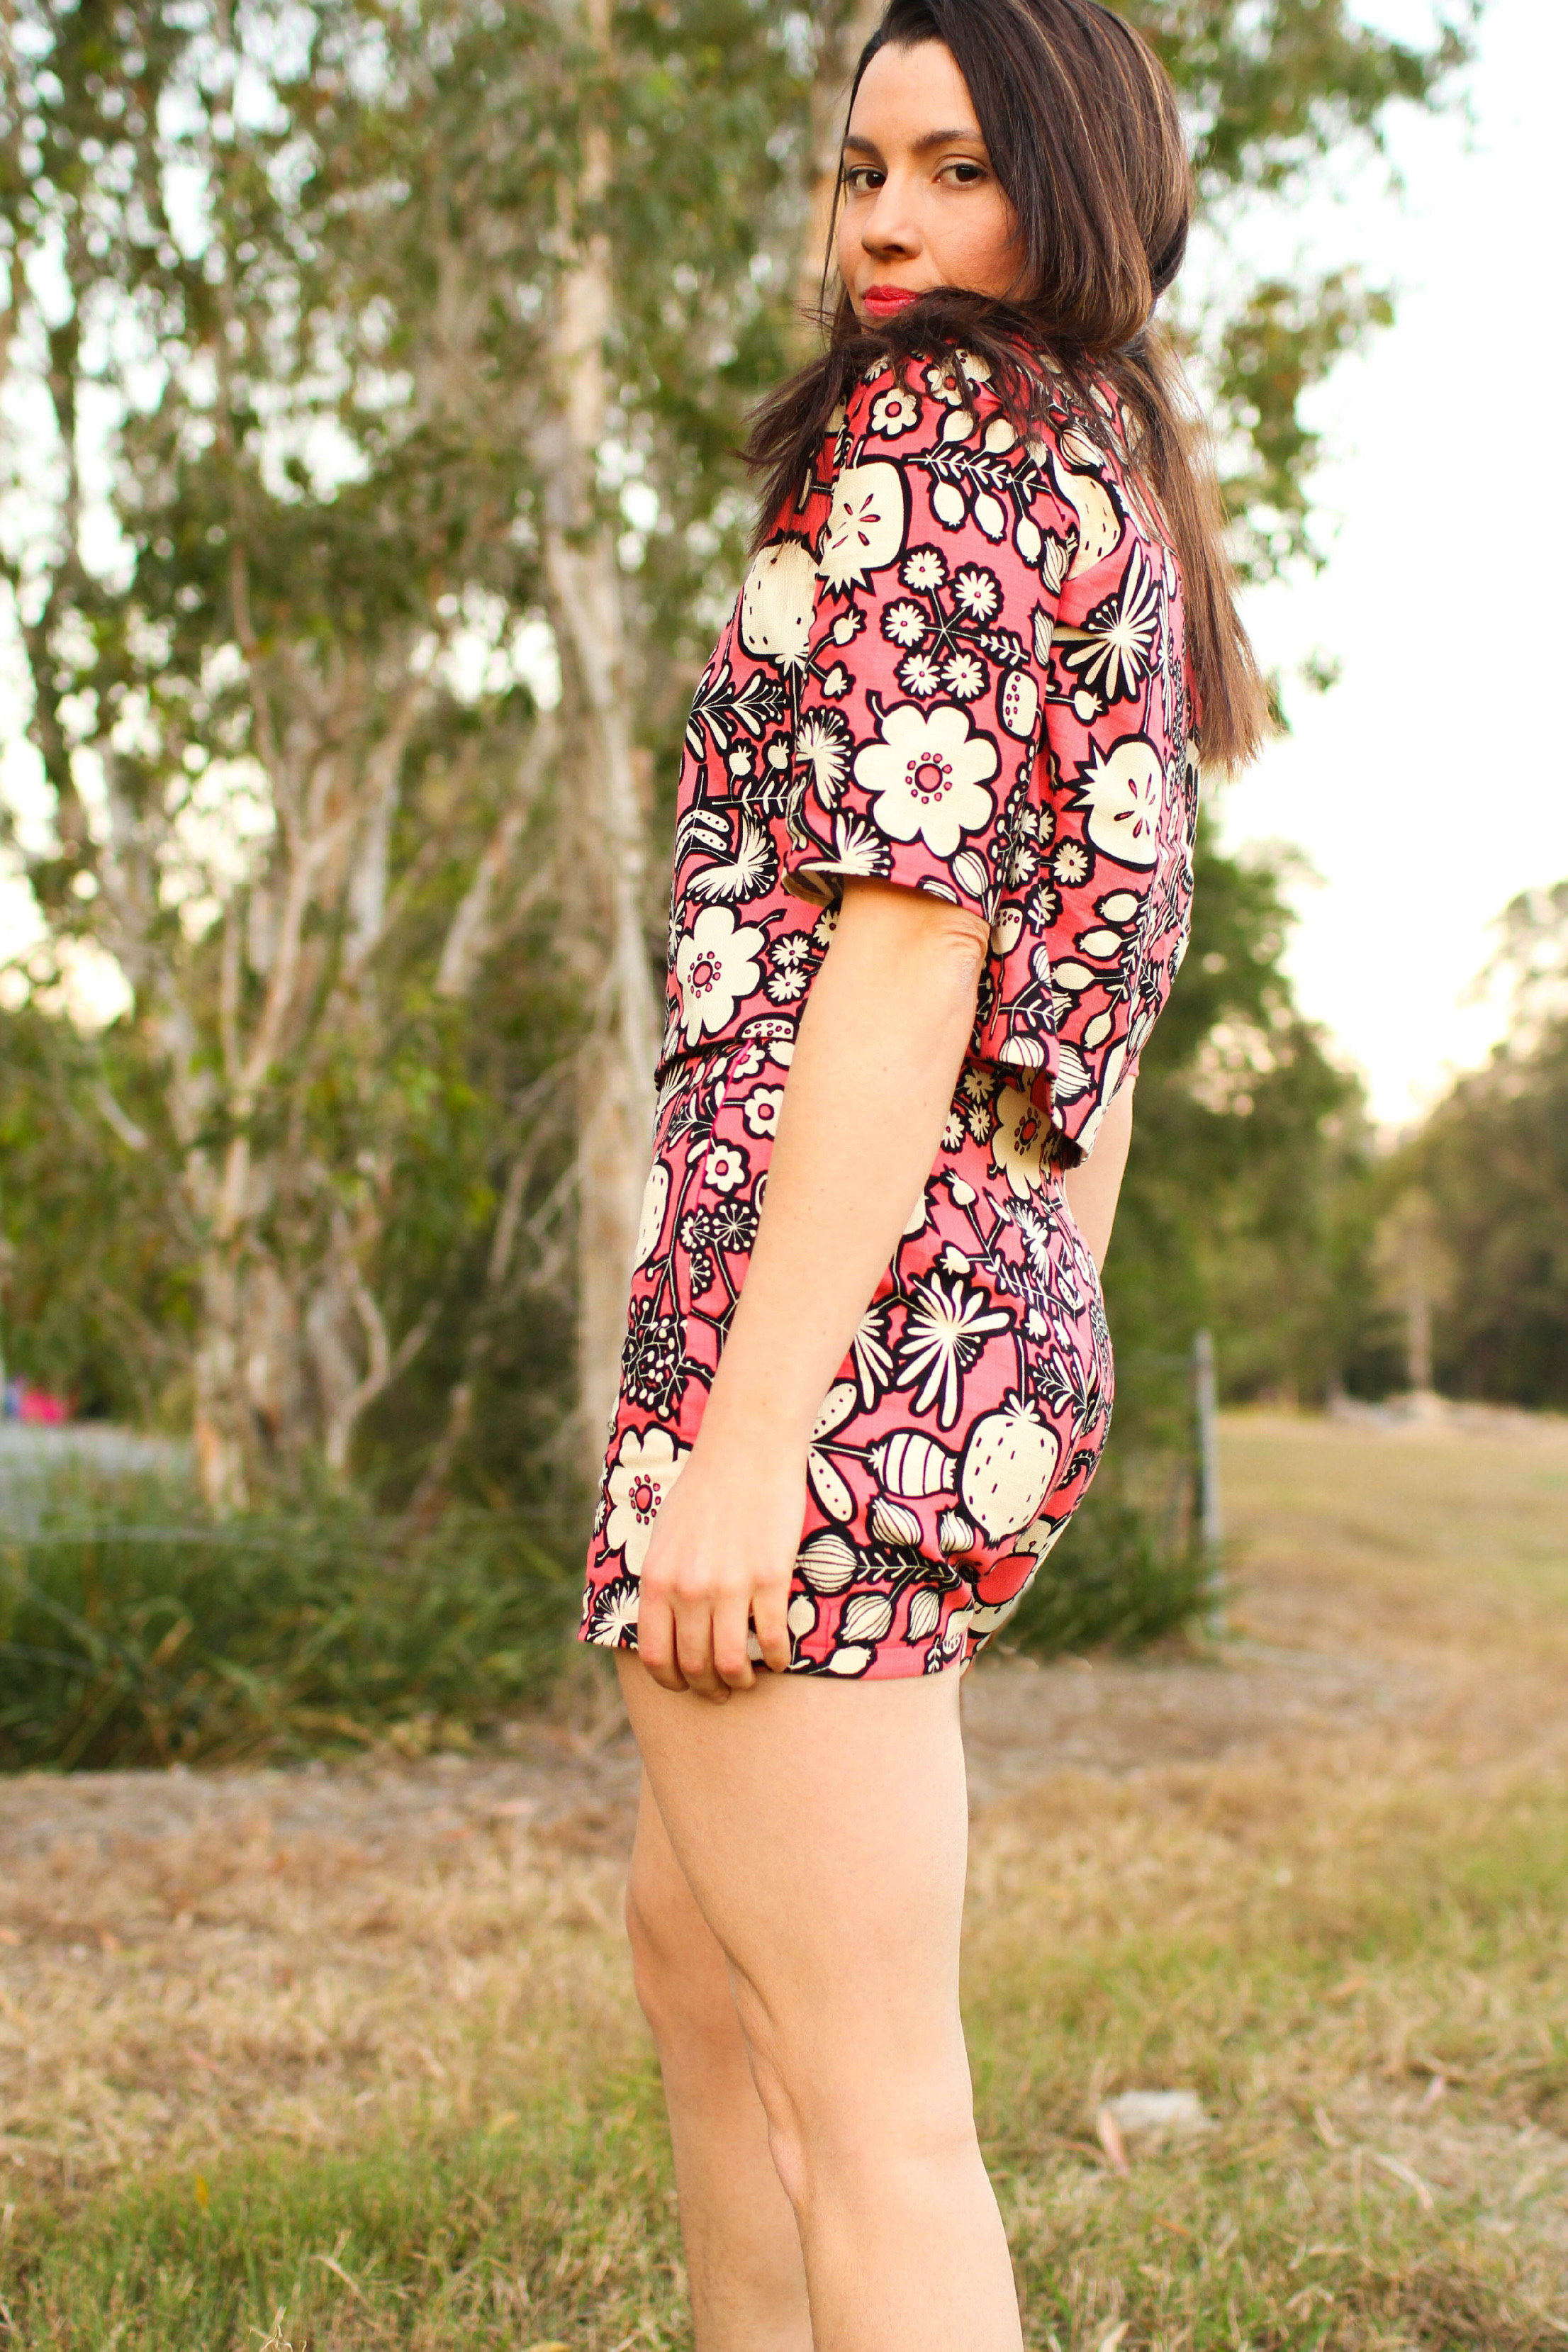 Unfortunately (or fortunately) the closest Tessuti is a whole state away so I chose a piece of this ‘Niwa’ Japanese printed cotton from their online store (they ship worldwide btw) for my Esthers. But back to the Niwa. It’s comes in four pretty colors, this pink is still available here. The fabric itself is a soft, textured cotton and a good weight for shorts but with an open weave that said ‘please don’t thrash me’. So I listened and tacked a silk cotton to all the pieces for less risk of splitage. The construction and instructions were quick and user friendly but it was about half way through when I realised the shorts wouldn’t be complete without a matching top. It is two-piece set month, don’t ya know?!
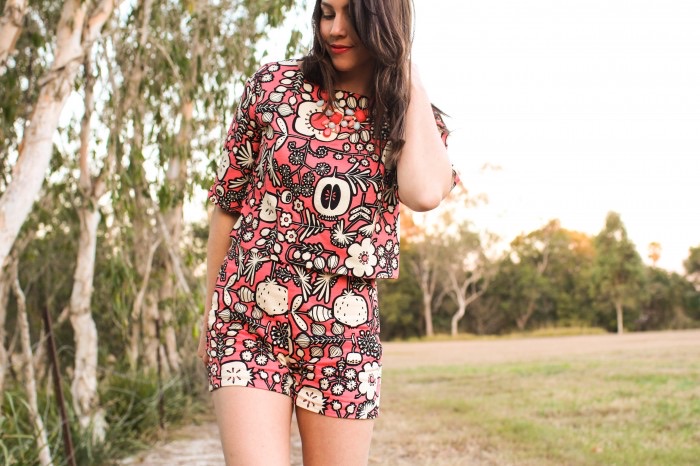 The top pattern is Simplicity 1366, aka, the boxy crop, and pattern I’m calling as go-to top half for two-piece sets. I just love the extra volume! Which I think helps to balance out the Esther shorts, being quite toit. For once I didn’t know which size to choose, because I did want it quite large and boxy. I chose the larger of two sizes (12) but even now I think I could even have sewn one size larger and still been happy with the volume. This pattern is dead simple and potentially addictive since all you’re dealing with is front, back, sleeves and neck binding. I skipped the neck binding and drafted a quickie facing for the neckline. And when I say drafted, I mean was feeling totally lazy and just hacked the facing straight out of the front and back pieces of the pattern itself. I’m sure it’ll stick back together just fine for next time. And there will be a next time…curious to see how it sews up in something silky like the pattern cover shows and also in fabric with more density…like scuba!
 I had a few thoughts on taking photos this week which maybe you’re interested in. And a massive breakthrough! This year I invested in a lightly pre-loved DSLR which I’ve been using for everything except my ACTUAL BLOG PHOTOS. Up until now it’s been royally convenient to have someone else take photos of hand-made outfits for the blerg. All the while, knowing the time was coming when I’d have to break out the tripod, which I’ve been simultaneously wanting to try out and successfully avoiding for about 6 months. But somewhere between Friday and Saturday I realised I had no-one to photograph these shorts for Tuesday. And out of pure necessity, on Sunday afternoon, I found myself in a paddock at dusk, sandwiched between a carpark and a main road, with a camera remote I didn’t know how to use, my brother’s schmancy lens, my dad’s tripod and a big fat cloud of doubt.
 In the space of two hours I figured out how to use the remote, stick the camera on the tripod, manoeuvre the legs of the tripod ( like wrestling a newborn giraffe) and give it a 2 second delay. I couldn’t work out how to take multiple shots on one press of the remote so it was all click. position. click. position. Not exactly free flowing and relaxed but that’s the next assignment along with editing skills. And because I expected the photos to turn out sub-par, I took a LOT of photos. Surprise surprise in between ALL the bloopers and blurred pics (something ain’t set right), there were actually quite a few passable / blog worthy pics. So I am officially mind blown, and more than a little bit proud for putting my big girl panties on /getting into the situation of having to do it solo or it probably would have been another 6 months before I ventured out.
 Oddly enough, the easiest part of the whole ‘shoot’ was the looking like a twat in public thing. Generally I try to go about it as if taking photos of myself in a field at dusk is the most appropriate thing in the world that I could possibly be doing right now. Not that I’m immune to feelings of self-consciousness. I don’t enjoy having other people watching me take photos, even when someone else is behind the camera. But I’ve kind of realised that people are just curious and they’re going to stare whether you like it or not. So give them something to stare at! Amp up that music that only you can hear, prance, dance, hair toss and generally enjoy your party for one while any onlookers back slowly, slowly away. Then run for their lives. I find going about it with an air of ‘WHAT?! You mean you DON”T take photos of yourself in a field at dusk?!’ helps.
 Well that turned into more than a few thoughts! I guess I found the whole debarkle interesting in a terrifying sort of way. But back to shorts. Between all the indie companies and commercial pattern designers there are soooo many good looking shorts patterns out there. I’ve listed a whole lot here but even since then more have been released like Katy and Laney’s Tap shorts and Papercut Anima shorts. For shorts inspiration all month long, here’s the line up…
7/28 – Inder Loves Folk Art & Fake It While You Make It
7/30 – Delia Creates & Casa Crafty & A Happy Stitch
7/31 – Noodlehead & Things for Boys & Sew Delicious
8/01 – Clever Charlotte & Thread Theory & Hideous! Dreadful! Stinky!
8/04 – Girl Like The Sea & Buzzmills & Make It Perfect
8/05 – Ada Spragg & You and Mie & Siestas and Sewing
8/06 – Groovy Baby and Mama & Caila Made & Cali Faye Collection
8/07 – Skirt as Top & Katy and Laney & The Scientific Seamstress
8/08 – Petit a Petit and Family & Max California & Melly Sews
02/08/2014
TWO+PIECE SET+ACULAR // Pure Icing Set
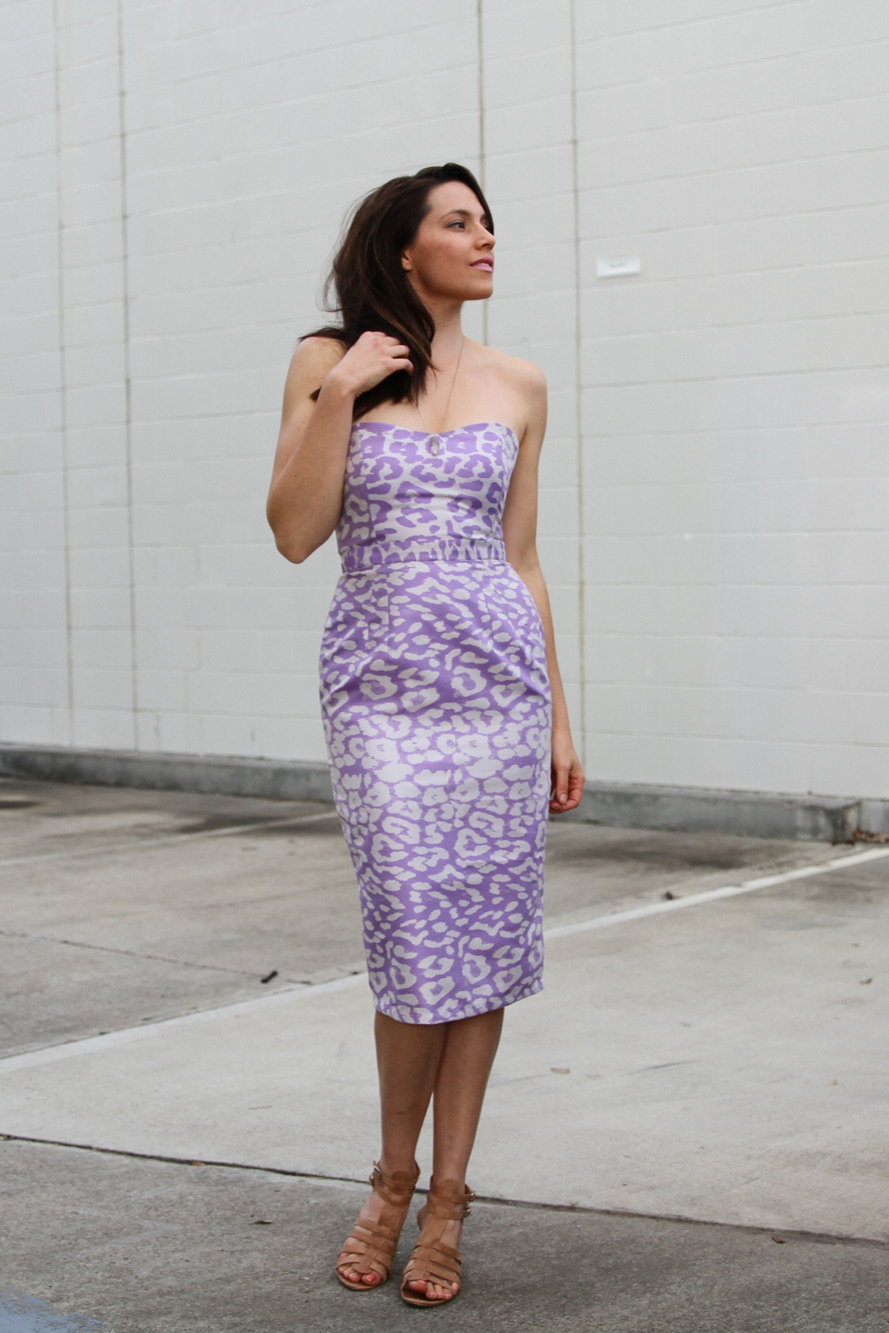
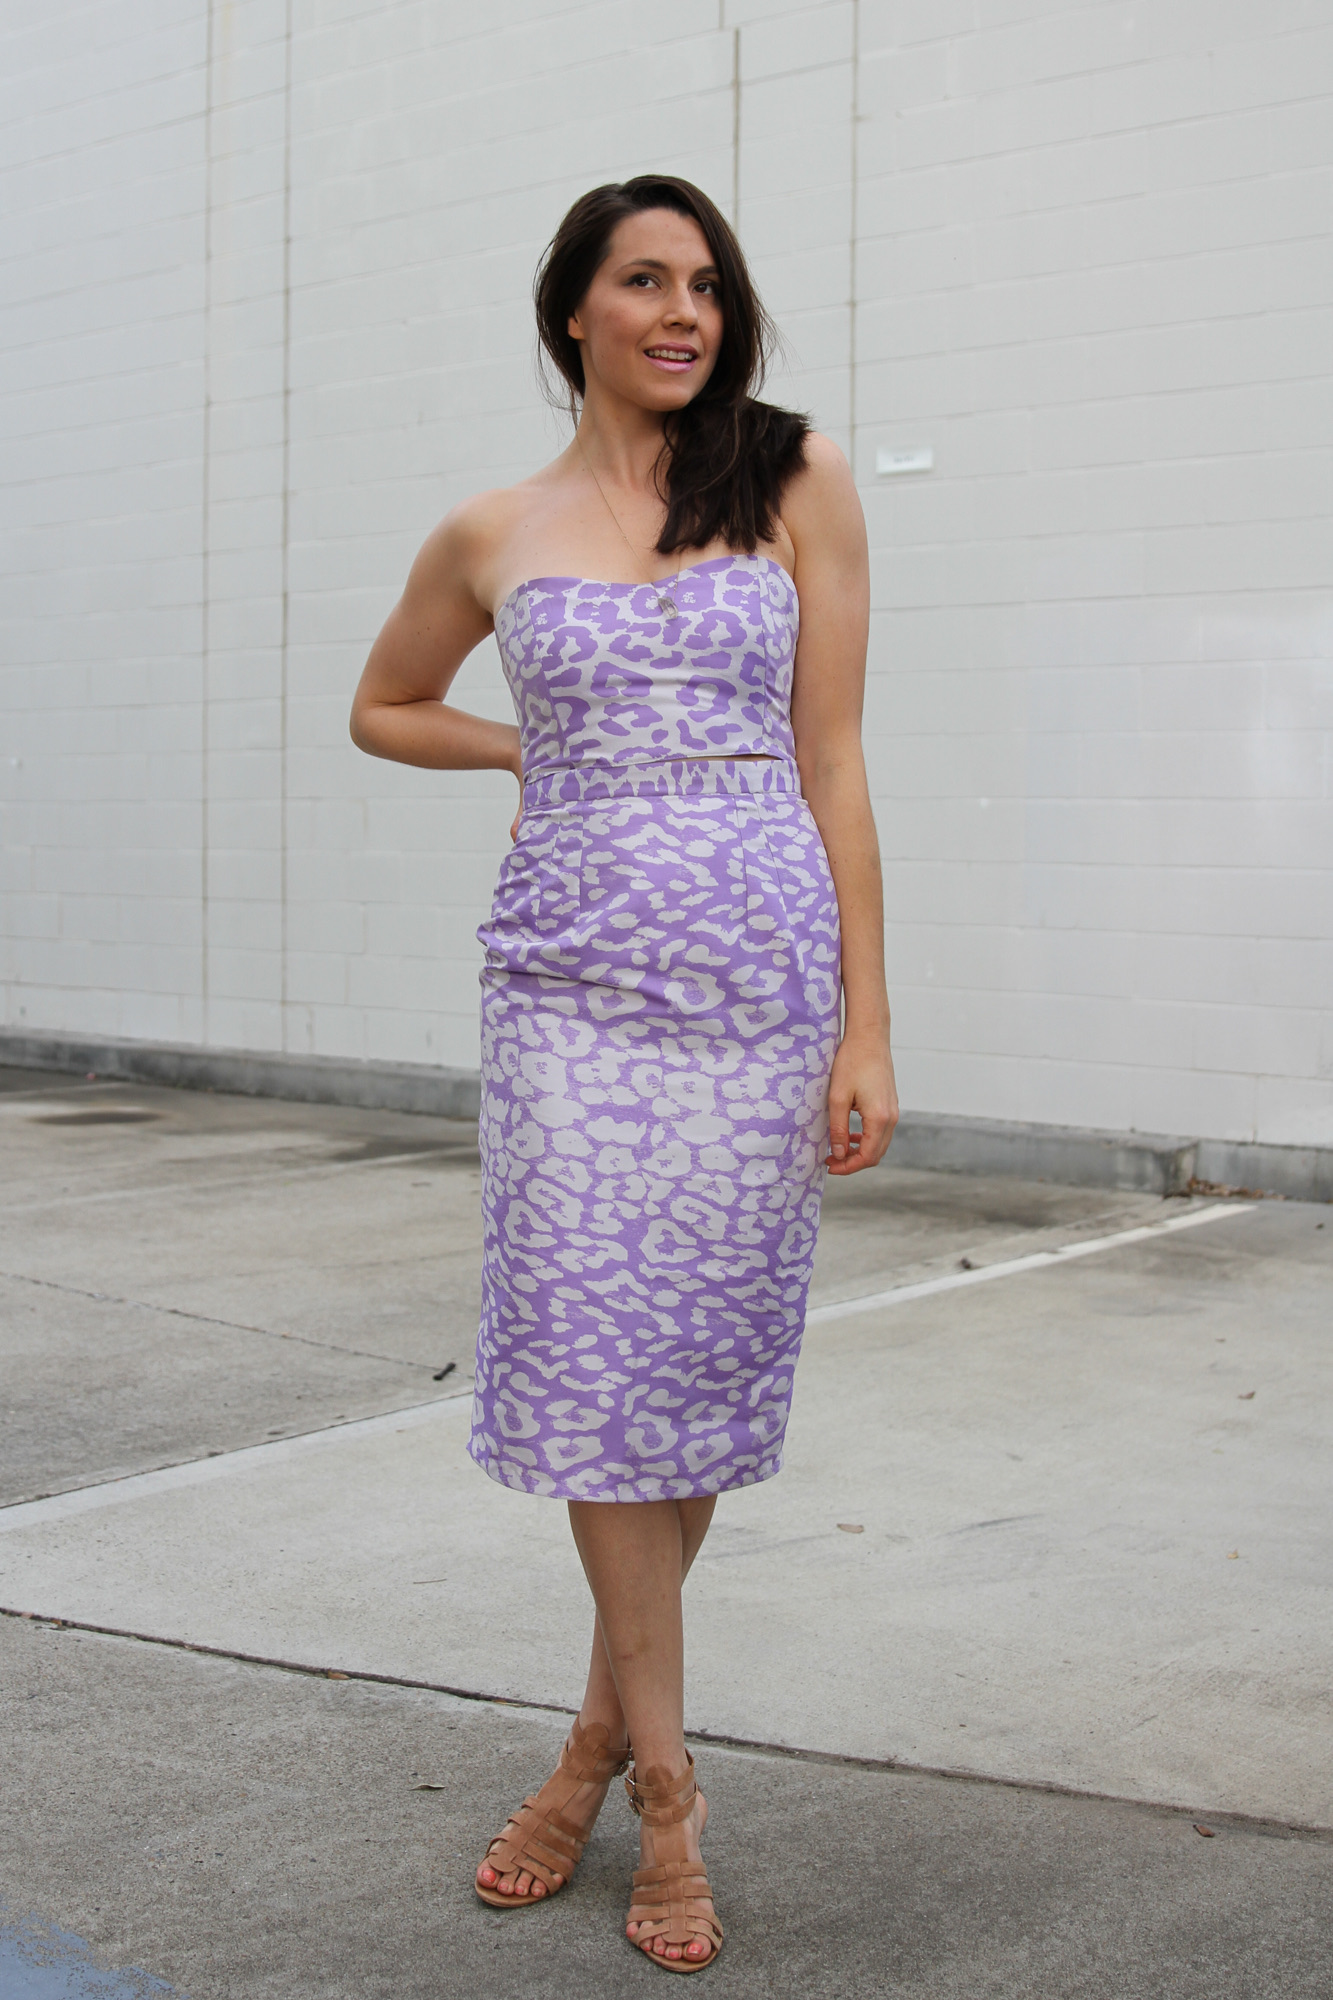 Sometimes you get a idea for an awesome DIY outfit and you’ve just gotta follow it through to the bitter /sweet end. Even though you know that what you’re about to make is pure icing and what your hand-made closet needs is pure cake. Okay enough cryptics! So, the icing and the cake discussion is always popping up on sewing blogs and I find it fascinating! To summarize unceremoniously, the cake is the stuff you want your closest to be made up of. Good basics, pieces you reach for daily, things that are actually pretty boring to sew, but usually get more wear. Then there’s the icing. In summary: my hand-made closet. Or 90% of it. For me, its a constant tug-o-war between the Jeckle and Hydes of my closet: the prints and solids. And more so a battle because things I wan’t to make are not necessarily the things I want to wear, which is a conversation for whole other day. But hey, when you have an vision for a two-piece set in possibly the most ICING-ISH fabric you’ve ever owned, you follow that whim, right? This purple pastel fabric is a synthetic something and I love love LOVE the color even though I am not technically an animal print girl. Presenting round two of Two-Piece Set-Acular…
 So the icing won. Which it mostly does and I’ve been happy to let it, up until this year’s Me Made May, which was my first and kind of a catalyst for my hand-made closet. Don’t get me wrong, my coset is certainly bursting with life! But some days I would look longingly over at the hand-makes of those who’s pieces were understated, went together so effortlessly and just looked so freakin comfy. Like Kelli’s, Katie’s and Leith’s. Then there were a couple of days I watched from the side-lines because I didn’t want to wear ANY of my hand-made stuff. And here’s an even bigger admittance. There were a couple when I changed out of my Me Made May outfit into my ‘home clothes’. Oh geez. Anyway May was a tipping point for a more balanced wardrobe which will be reflected in my next lot of sewing, post Two-Piece Set-Acular. It also happened to be right around the time I fell in love with this crazy two-piece thing. Like the prints knew their days of sole domination of my closet were numbered and crescendoed into a whole new level of printy love…two-piece sets!
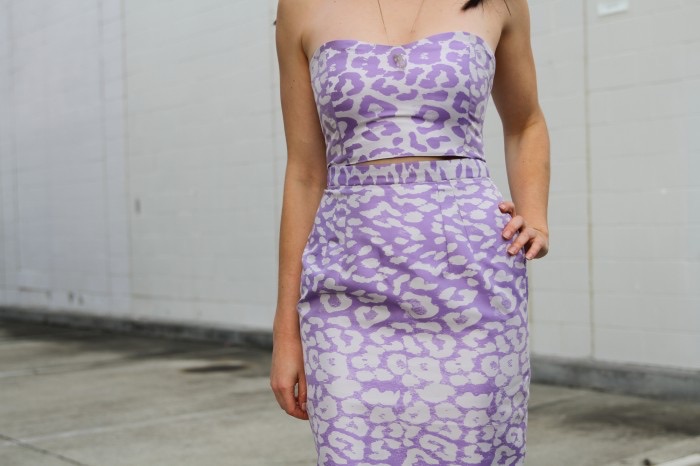
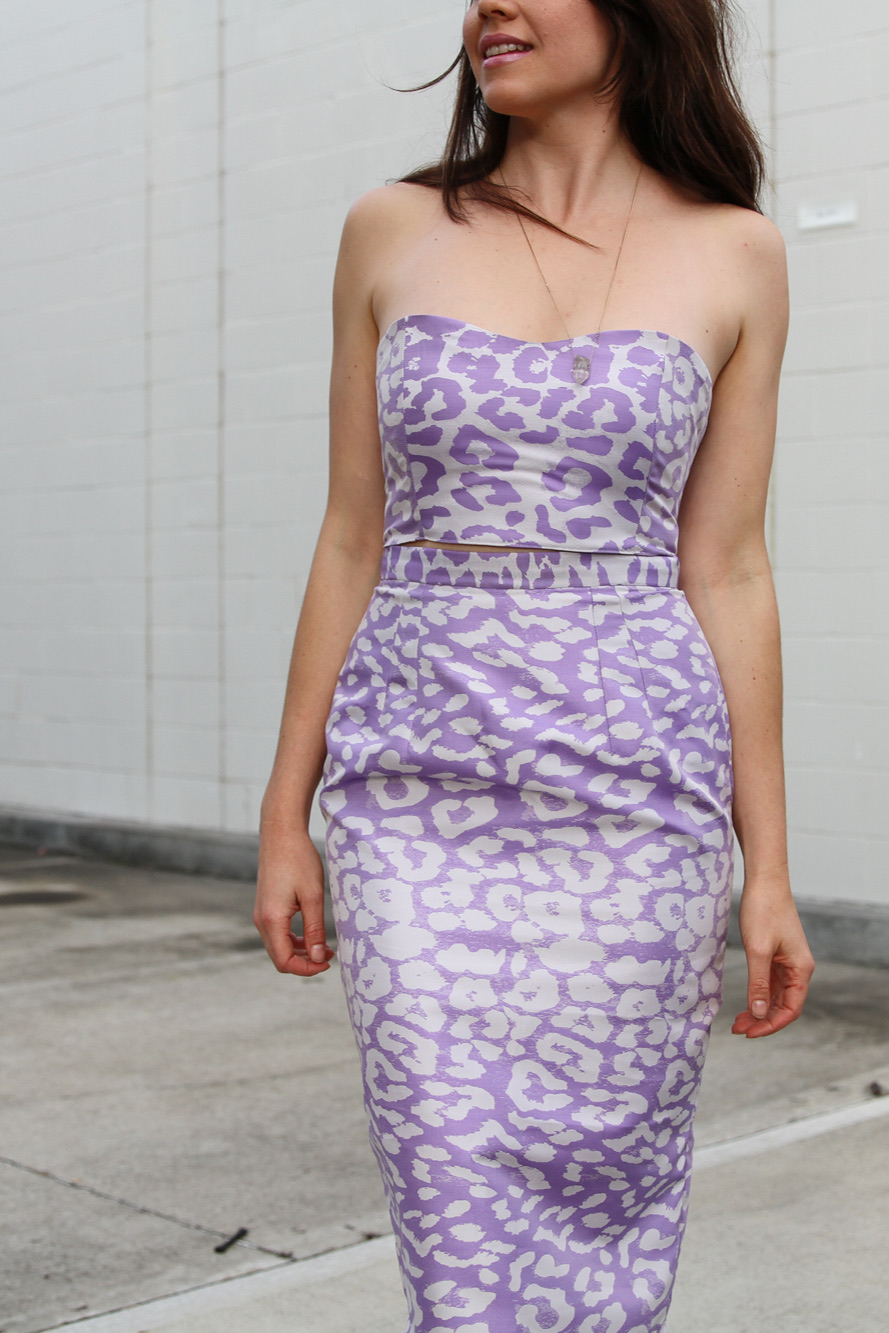 I knew this outfit was icing before I started but when I wore it for the first time I realised just how much so. Firstly, I don’t really ‘do’ strapless. I’m a paranoid strapless wearer, never entirely trust them. Second, I had to drive really fast to the spot where I was taking photos because I was losing feeling in my legs because this fabric has NO stretch whatsoever. Third, when I finally peeled myself off the car seat, I realised the pattern called for woven with stretch for a reason…with my stride length halved, my walk was reduced to a totter even with a split in the back. As we were taking pics, it did occur to me that should I have to flee in any kind of hurry (bush fire, wild boar, football fans) it would have been bye-bye skirt.
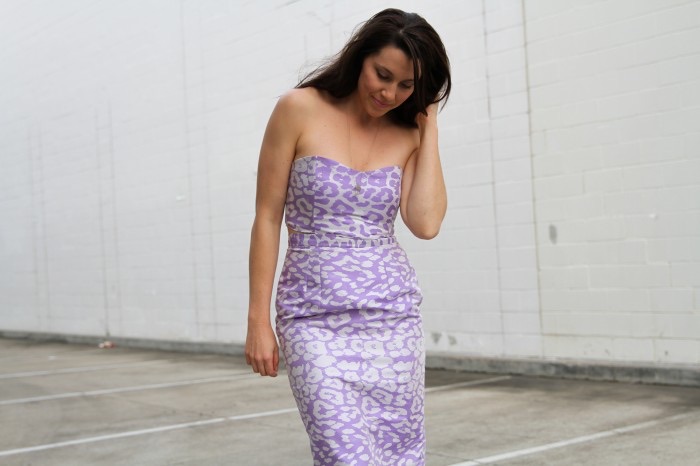
 Impracticalities aside, as a totally fun and frivolous make, I do feel pretty fabulous in this two-piece! As for wearing them as separates, the skirt looks really great with quite a lot of things. So I will reserve it for occasions where I’m only required to take small steps or don’t need to eat. But moving on to the next comedy, the construction. I was all enthused for an uncomplicated piece-o-cake project, which the By Hand London Charlotte skirt is. And would have been except I like to make things as difficult as possible when I sew by choosing a fabric with NO stretch. Which I then cut out in the total wrong size. Please explain? So, I was lucky enough to slip into this pretty Charlotte for sizing purposes, which was deemed a great fit, only I didn’t take into account that Reana’s fabric had stretch and this one didn’t. So the size 10 was too small, as in, side-seams-won’t-meet kind of small. Fortunately there was enough fabric to go back and cut a size up (a 12) or we’d all have been washed away in the river I cried, never to be seen again.
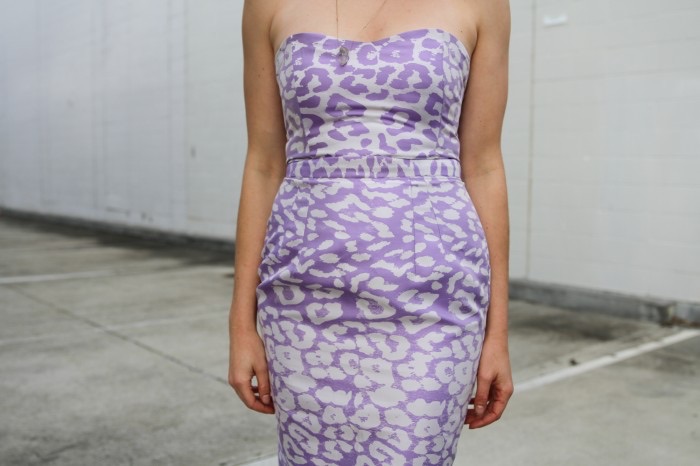
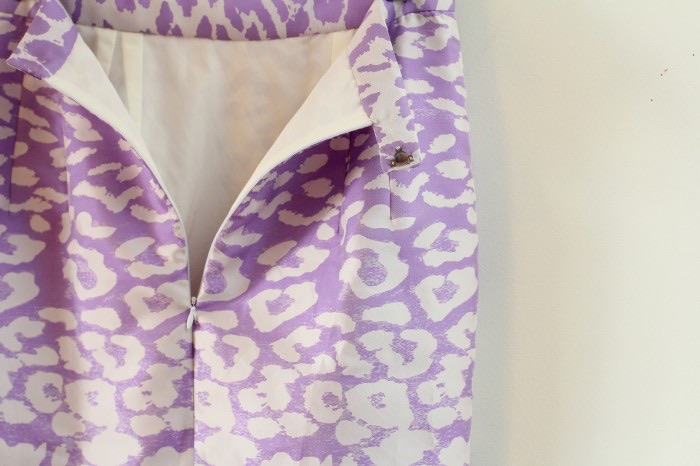
 So possibly I am the last one to the Charlotte skirt party and have much the same things to say as others before. Cute pattern, generous hip ease, easy-to-navigate instructions etc etc. I had some confusion over adding a lining (for aesthetic purposes) which I cut out in a silk-cotton using the same pieces as the outside. What I really wanted to do was join the skirt and the lining at the hem, or more sort of tuck the lining into the skirt hem for a really neat finish. But when I did this, the outside of the skirt got all bunched up in places as if the lining was pulling on it somewhere and making it sit all gross (sad face). In the end, I resorted to letting the lining hang loose , but then I could see it poking through the split at the back so I cut it off shorter. One thing after another! Something to think about, should you insert a lining into the Charlotte is how many darts you will be sewing. Me and darts, we go okay but I’m always frothing to get stuck into the ‘meat’ of a pattern and then I remember the darts come first…16 in this case!
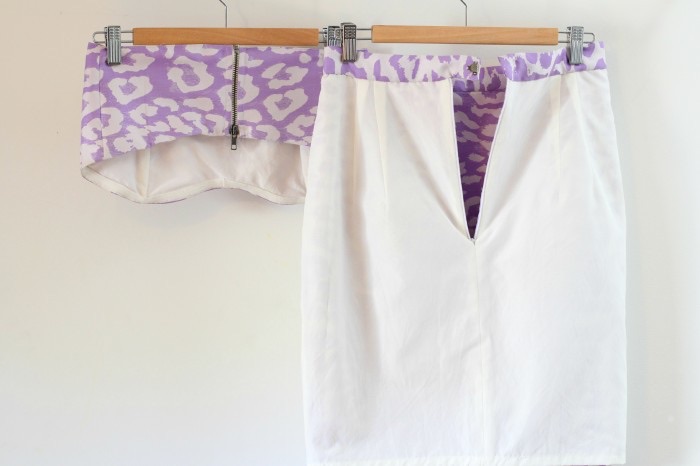
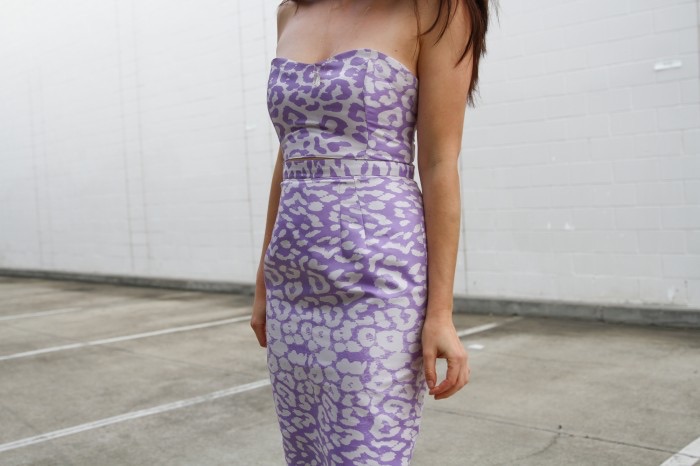
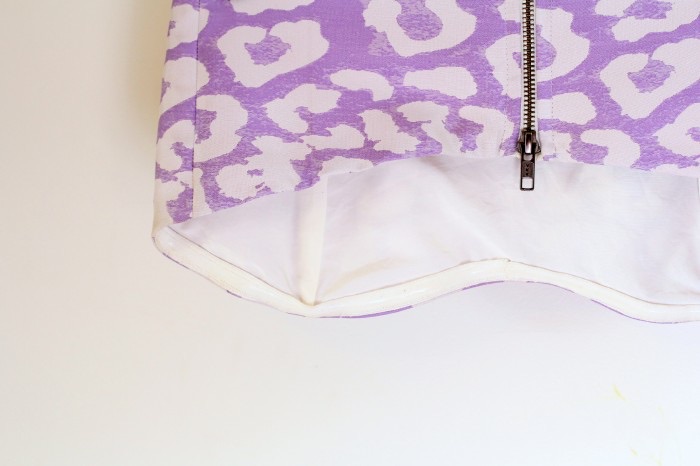
 I’m especially happy with the insides and little details here. I think they really make a garment, don’ t you? I never used to be bothered making the insides pretty but now it’s almost an obsession. Here I French seamed the insides and hand-stitched the waistband to the inside of the skirt.And finally I feel like I’ve got my invisible zips down pat, which was one of my ‘sewing goals‘ for the year. This fabric is kind of neat, being almost reversible and I had some fun alternating between pieces cut on the right side and wrong side for the bustier pieces and the skirt waistband.
 Clearly the most exciting bit here is the Bustier! Exciting because it was my first time sewing with boning. Unhelpful because I made it from an already existing bustier. Basically I gutted the whole thing, traced the pieces and pilfered its boning, zip and the sticky stay tape that makes it cling to your skin. Which turned out to be a good way to have a go at a structured bustier, having all the hard work done before me and knowing it would turn out if I could just sew it all back together. And because I feel bad about being a big fat tease, should you want to try sewing a bustier from a pattern, there’s a couple of good looking ones on Burdastyle (See here and here) and there’s always Gertie’s Bombshell dress. Hey, and it turns out boning, is not made from whales, but wire! Something I kind of knew but I guess like some modern day archaeologist, deep down I thought I still might find actual bones inside the casing.
I am so excited to see some SET-ACULAR two-piece sets popping up already. There will be a round-up at the end of August, but in the meantime you can see who’s making what with the hashtag #twopiecesetacular on Instagram.
26/07/2014
TWO+PIECE SET+ACULAR // CHECK EDITION

Fashion is a funny thing, hey?! Take it back a month or two and you couldn’t have paid me to leave the house in a matching set. Or you could, but it would have cost you a lot of fabric. And here we are, me in my first edition to Two-Piece SET-ACULAR feeling pretty fine and dandy and you, probably asking Two-Piece Set-WHAT-ular and wondering if you’ve stepped back onto the set of Clueless. So, let’s recap. In This week’s See It Sew It post, I admitted a growing fondness for this 90’s throwback trend of matching sets, or’ Co-ords’, and invited the Blogosphere in for a Two-Piece Set-acular! And yes, I was a leetle bit nervous that it might be a party for one so I’m pretty flippin happy that you guys want to play along! Literally tongue hanging out to see your sets. As for a time frame in which to sew & blog / instagram your makes, I’m declaring August (or between now and then) official two-piece fiesta month! 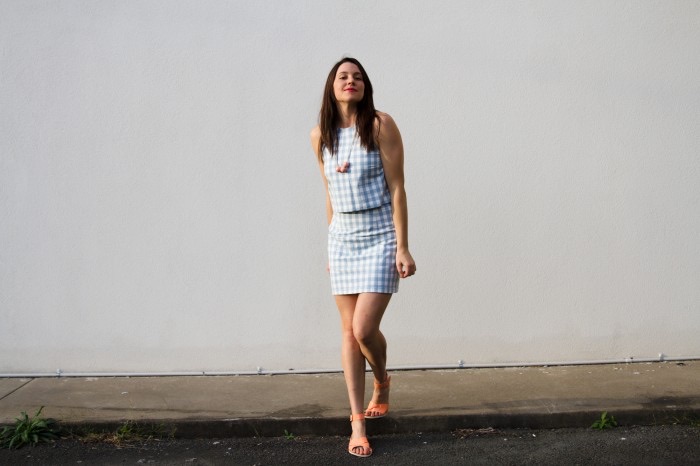
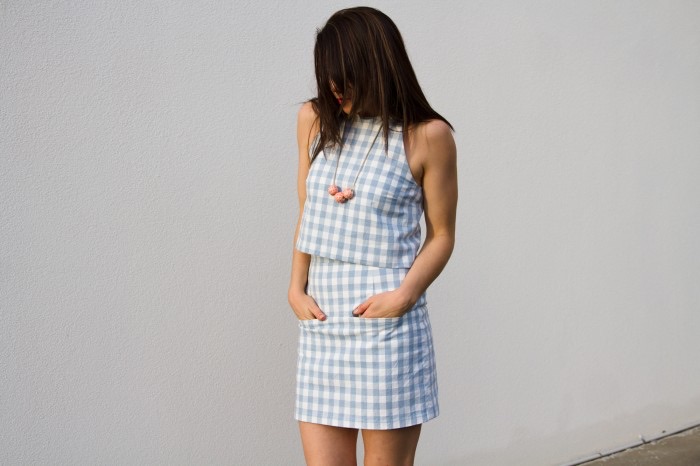
Ok, so I mentioned here that why this trend is so much fun is that pretty much anything goes. There are all sorts of silhouettes that make for rockin two piece sets and I got all inspired and sketched up some combo’s that work with suggestions for sewing patterns you could use. This is a the perfect time to experiment with new shapes & styles OR return to those favourite sewing patterns, the ones you know and love and feel good in, which for me are these two: the Hannah Top by Salme patterns, previously sewn here, and Vogue 1247, from this recent polka+ floral combo. I think these two patterns work together as a Two-Piece Set because there is balance between the snug-ish skirt and the loose boxy fit of the top. The skirt is relatively short but the top has a high-neck, which all make me feel comfortable and not ‘exposed’.

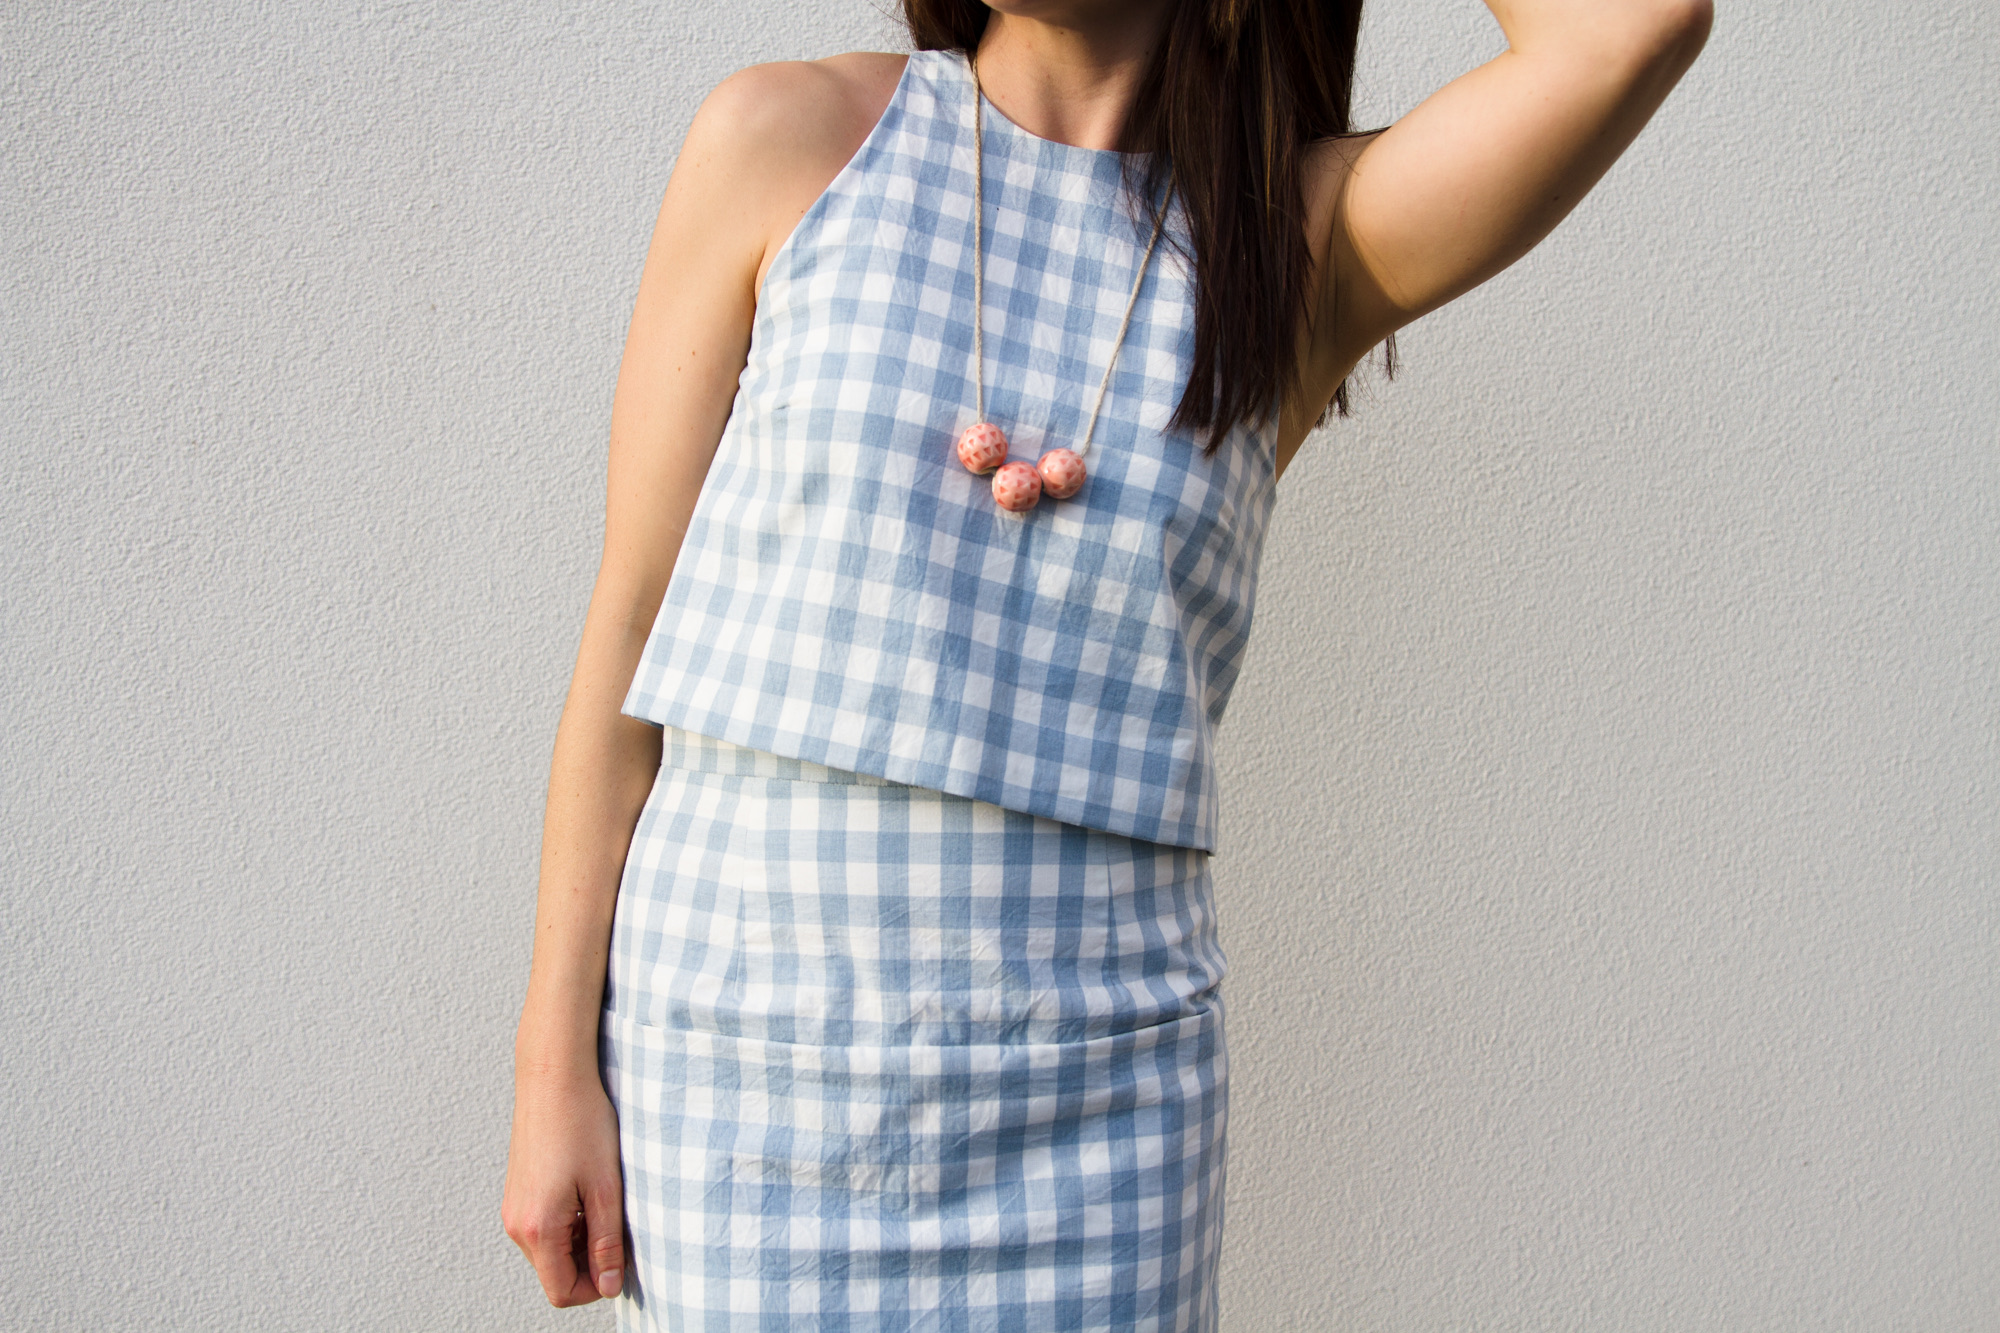
How LOUD you like your two-piece sets is a matter of personal preference. I think this one is pretty tame really and proves that can do this trend with subtlety too. It all has a lot to do with the fabrics you choose. This print, a plain cotton check, is not something I’d usually go for except that I had a vision of it becoming something a little left of centre. It’s not a fabric you’d expect to see in a 90’s style crop or a two piece set, which is why it’s so FUN! But both pieces have slotted so easily into my closet as separates too. The top often gets worn with this pencil skirt, while bottom half looks cute with a white tee & my RTW navy blazer. Together they’ve made my hand-made closet more versatile, especially because the print is kind of neutral. So, a great idea before you start on your two-piece is to consider how it will mingle with the other items already in your closet. And when that sad day comes when no-body is wearing matching sets again, you don’t have to retire it! 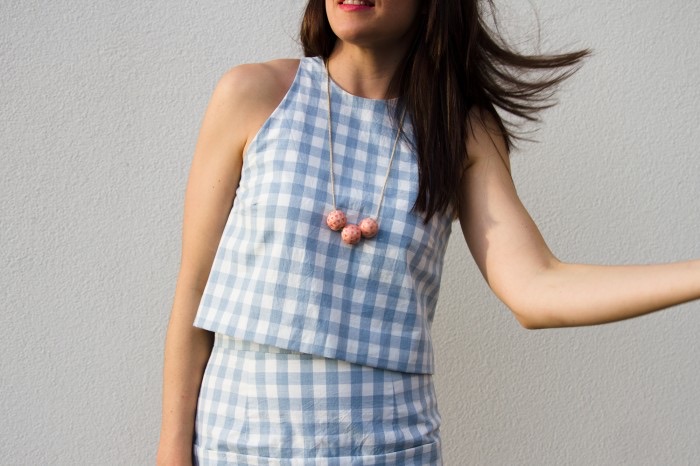
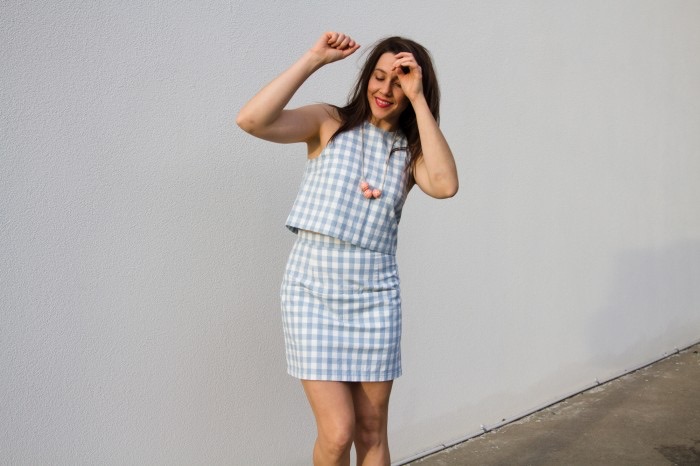
Top // Size? 10 Mods? Extended the neck facing down into a full lining for more stability (fabric is quite light). Loved? The facing makes for an uber clean finish around the neck and armholes. Just cos? I made a matching self-cover button which didn’t make it in the photos & lovingly hand-tacked the hem.
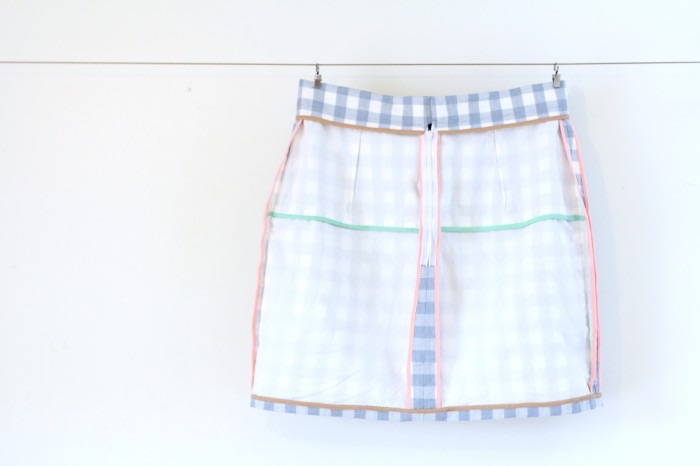 Skirt // Size? 12 Mods? Same as this one, sheered a little off at the bottom side seams and back seam for a closer fit. Also, added the extra length I needed this time to make a proper hem. As well as a little extra length to the waistband so it overlaps lol. Loved? The way it’s all put together, especially the joey pockets and the insides, with their pretty binding. This time I used some left over bits in my stash and I like the effect, even if it makes me hungry for gelato!
So, what do you think? If you’d like to join in the festivities but want some more inspiration, there’s whole lot of matchy matchy goodness here and if you’re button-happy, feel free to grab yourself one here. There are even two-piece sets out in the blogosphere by a few girls already on it and yards ahead obviously: a summerlicious set by Sallioeh and this lovely by Madalynne.
16/07/2014
DIY Pleated T-Shirt
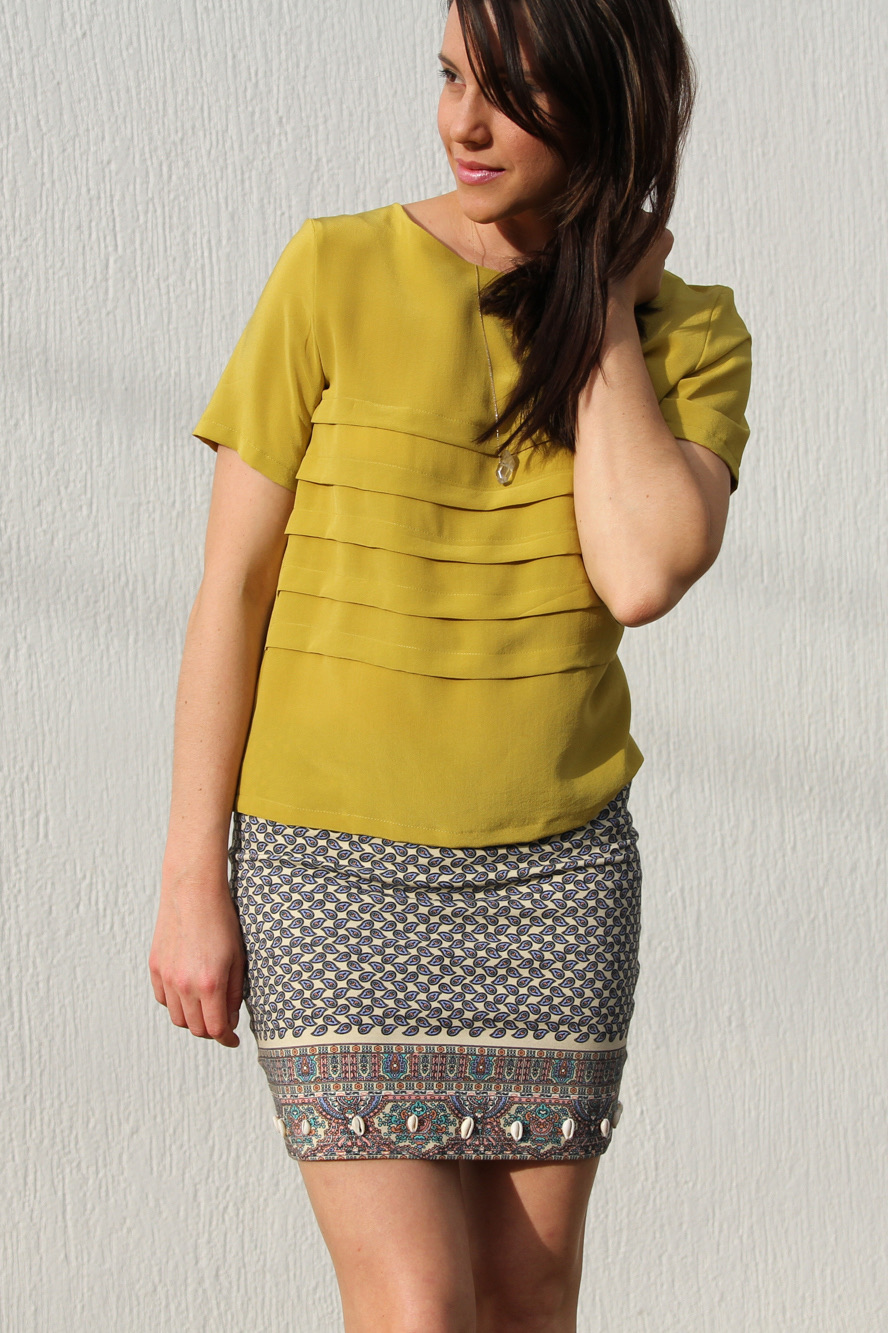
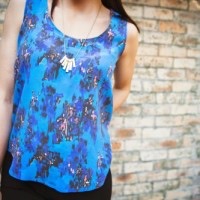
Aloha! We’re starting to scrape the bottom of the un-blogged projects pile here. This top, the Salme Patterns Pleated T-shirt has become one of my favourite pieces in the hand-made closet. Bahhh? No prints here? Well, that’s what grabbed me with this pattern; it looks so great sewn up in solid colors, you don’t need any flamingos / triangles when you have a pretty pleated front. For once I was smart enough to take my print goggles off for a second and recognise this!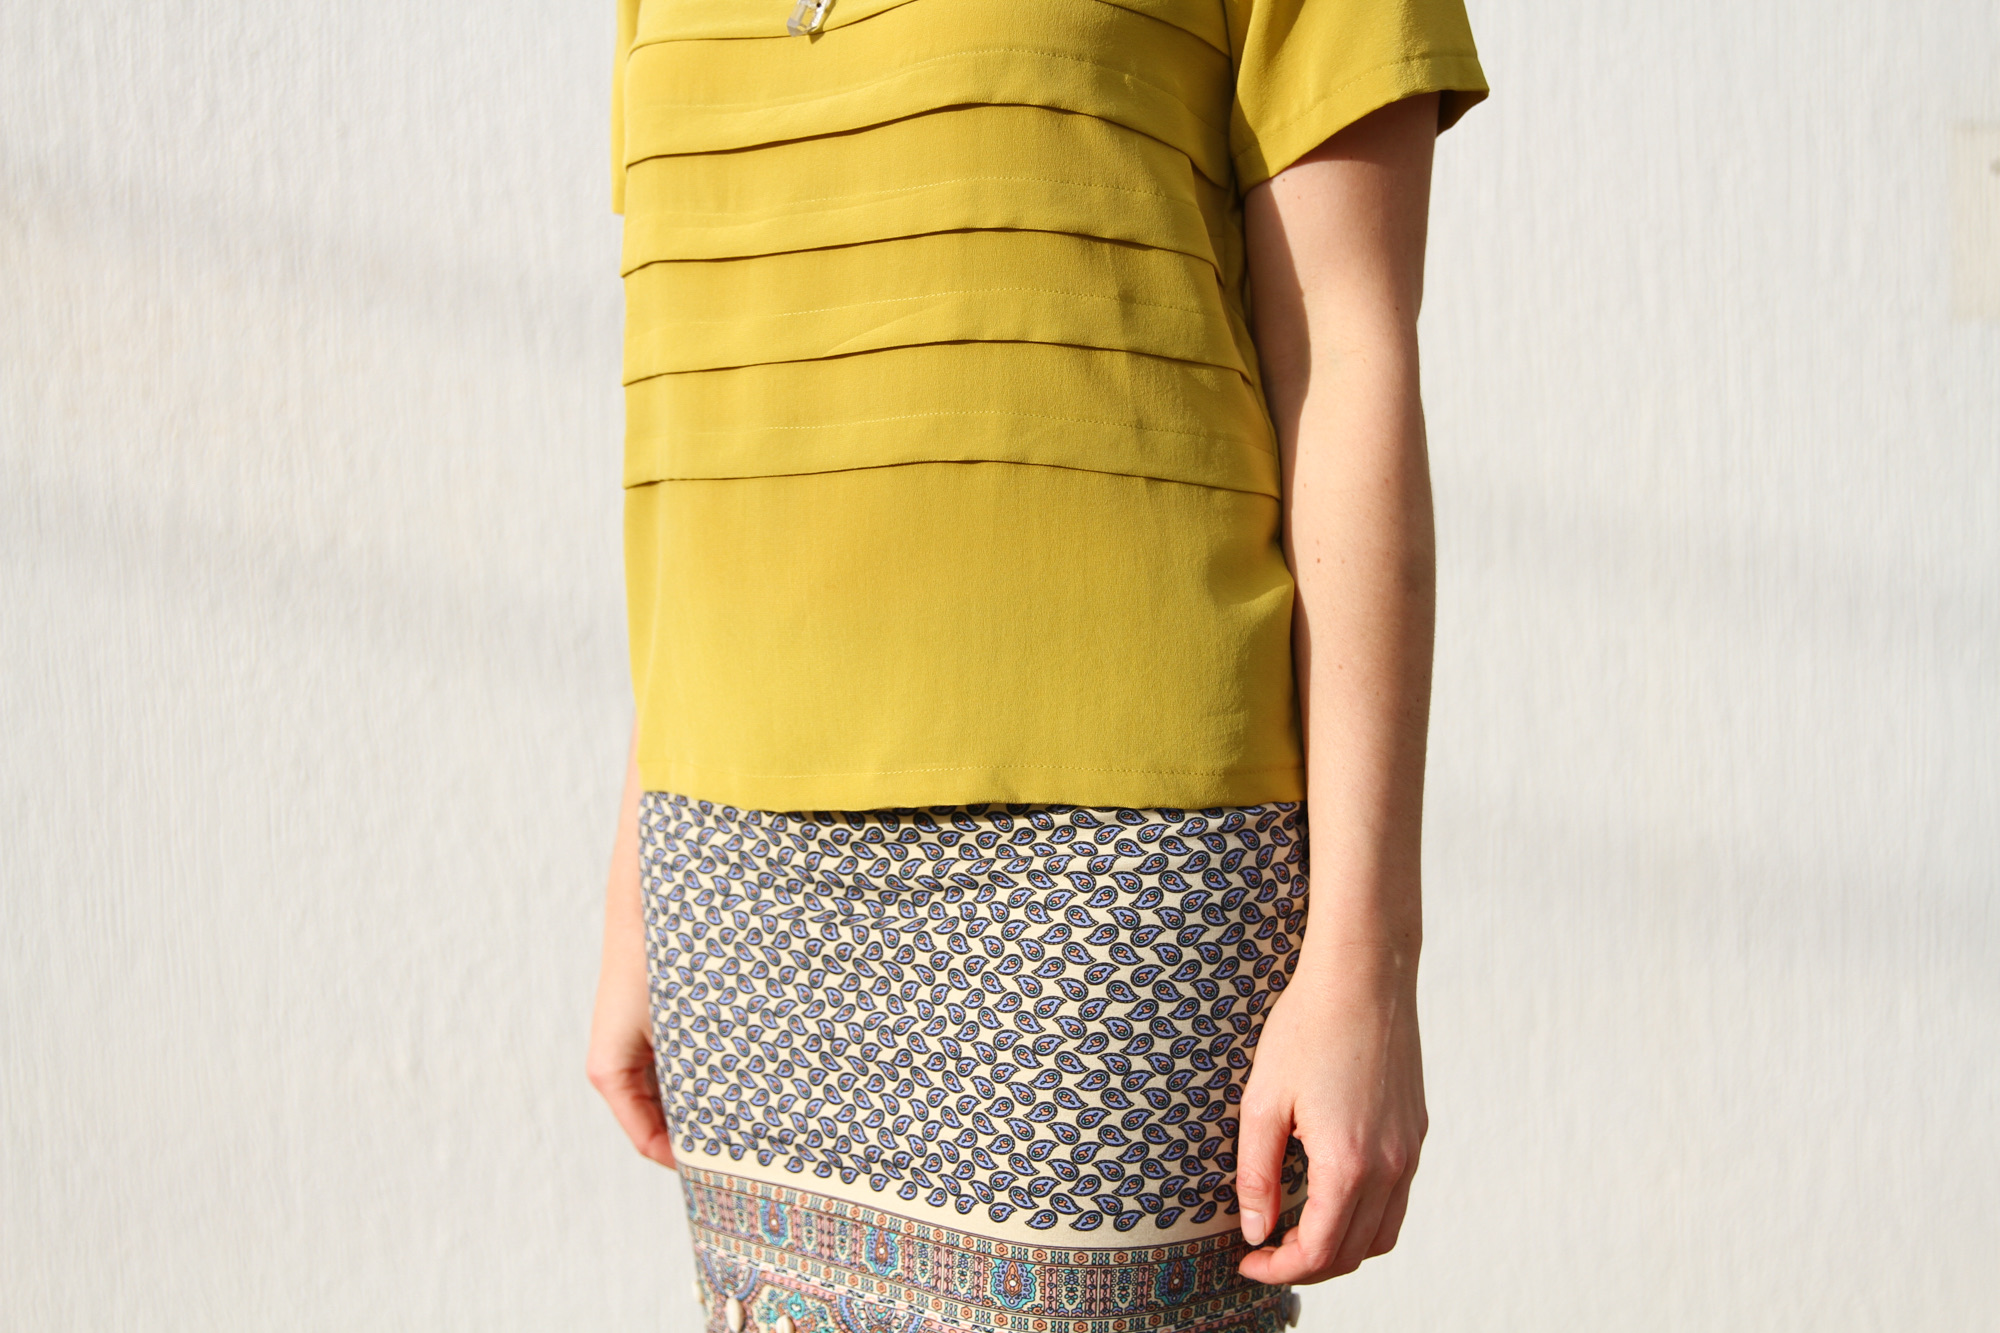
The fabric is one of my favourite pieces from the stash. It’s a silk crepe de chine and I have to say these photos don’t really do the delicious chartreuse color justice. It’s also the fabric I used way back in Project Sewn for the pieced sleeves on this blazer. And I’m extremely very happy that it’s now made up into this simple top and I now get to enjoy it twice as often. Is that weird? Do you ever find that you love a fabric so much, that you feel like why stop at one piece when you could sew two?! And that right there is the argument for this crazy two piece set trend which I’ve fallen prey to!
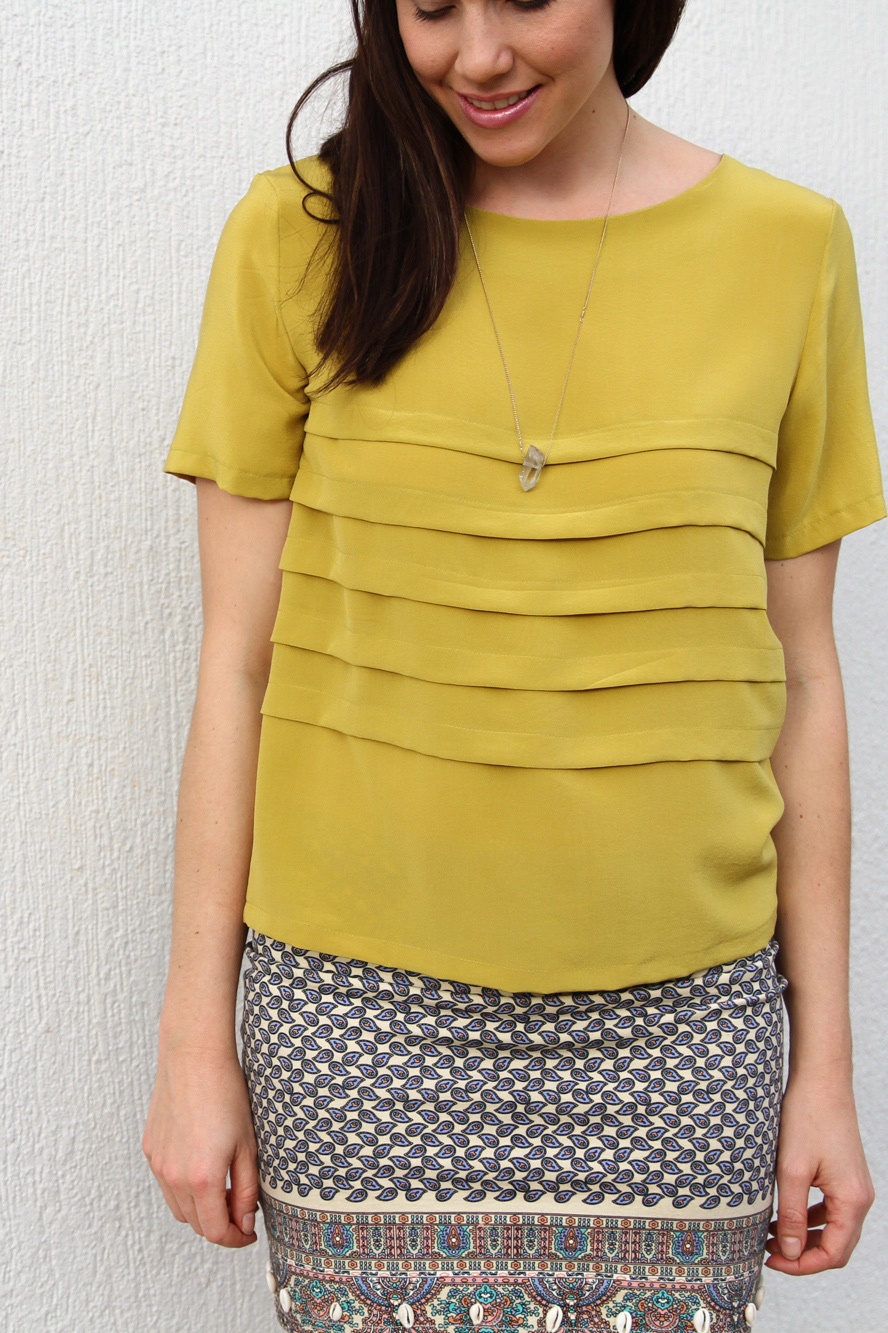
The pattern is a goodie. Friendly instructions. Great fit straight off. A facing finish for the neckline. And dem pleats! I didn’t really have a system for marking the pleats, can’t recall exactly how I did it but just know it was not above board. Apart from that it all went rather fabulously. And I’m glad I added sleeves in the end so thanks to all who cast your ‘to sleeve’ or ‘not to sleeve’ vote in Instagram. I would still have one sleeve on and one off without you.

Size? 8. Mods? None. Loved? The facings and the pleats. Loathed? My pleat making method. Sew again? Ab-sew-lutely. Some other must-see versions of this pattern: Kelli’s neon lovely…so good! I also happen to love this cream one by Quixotic thread. Does this mean I’m a changed woman…converted to solids forever? Ha! NO!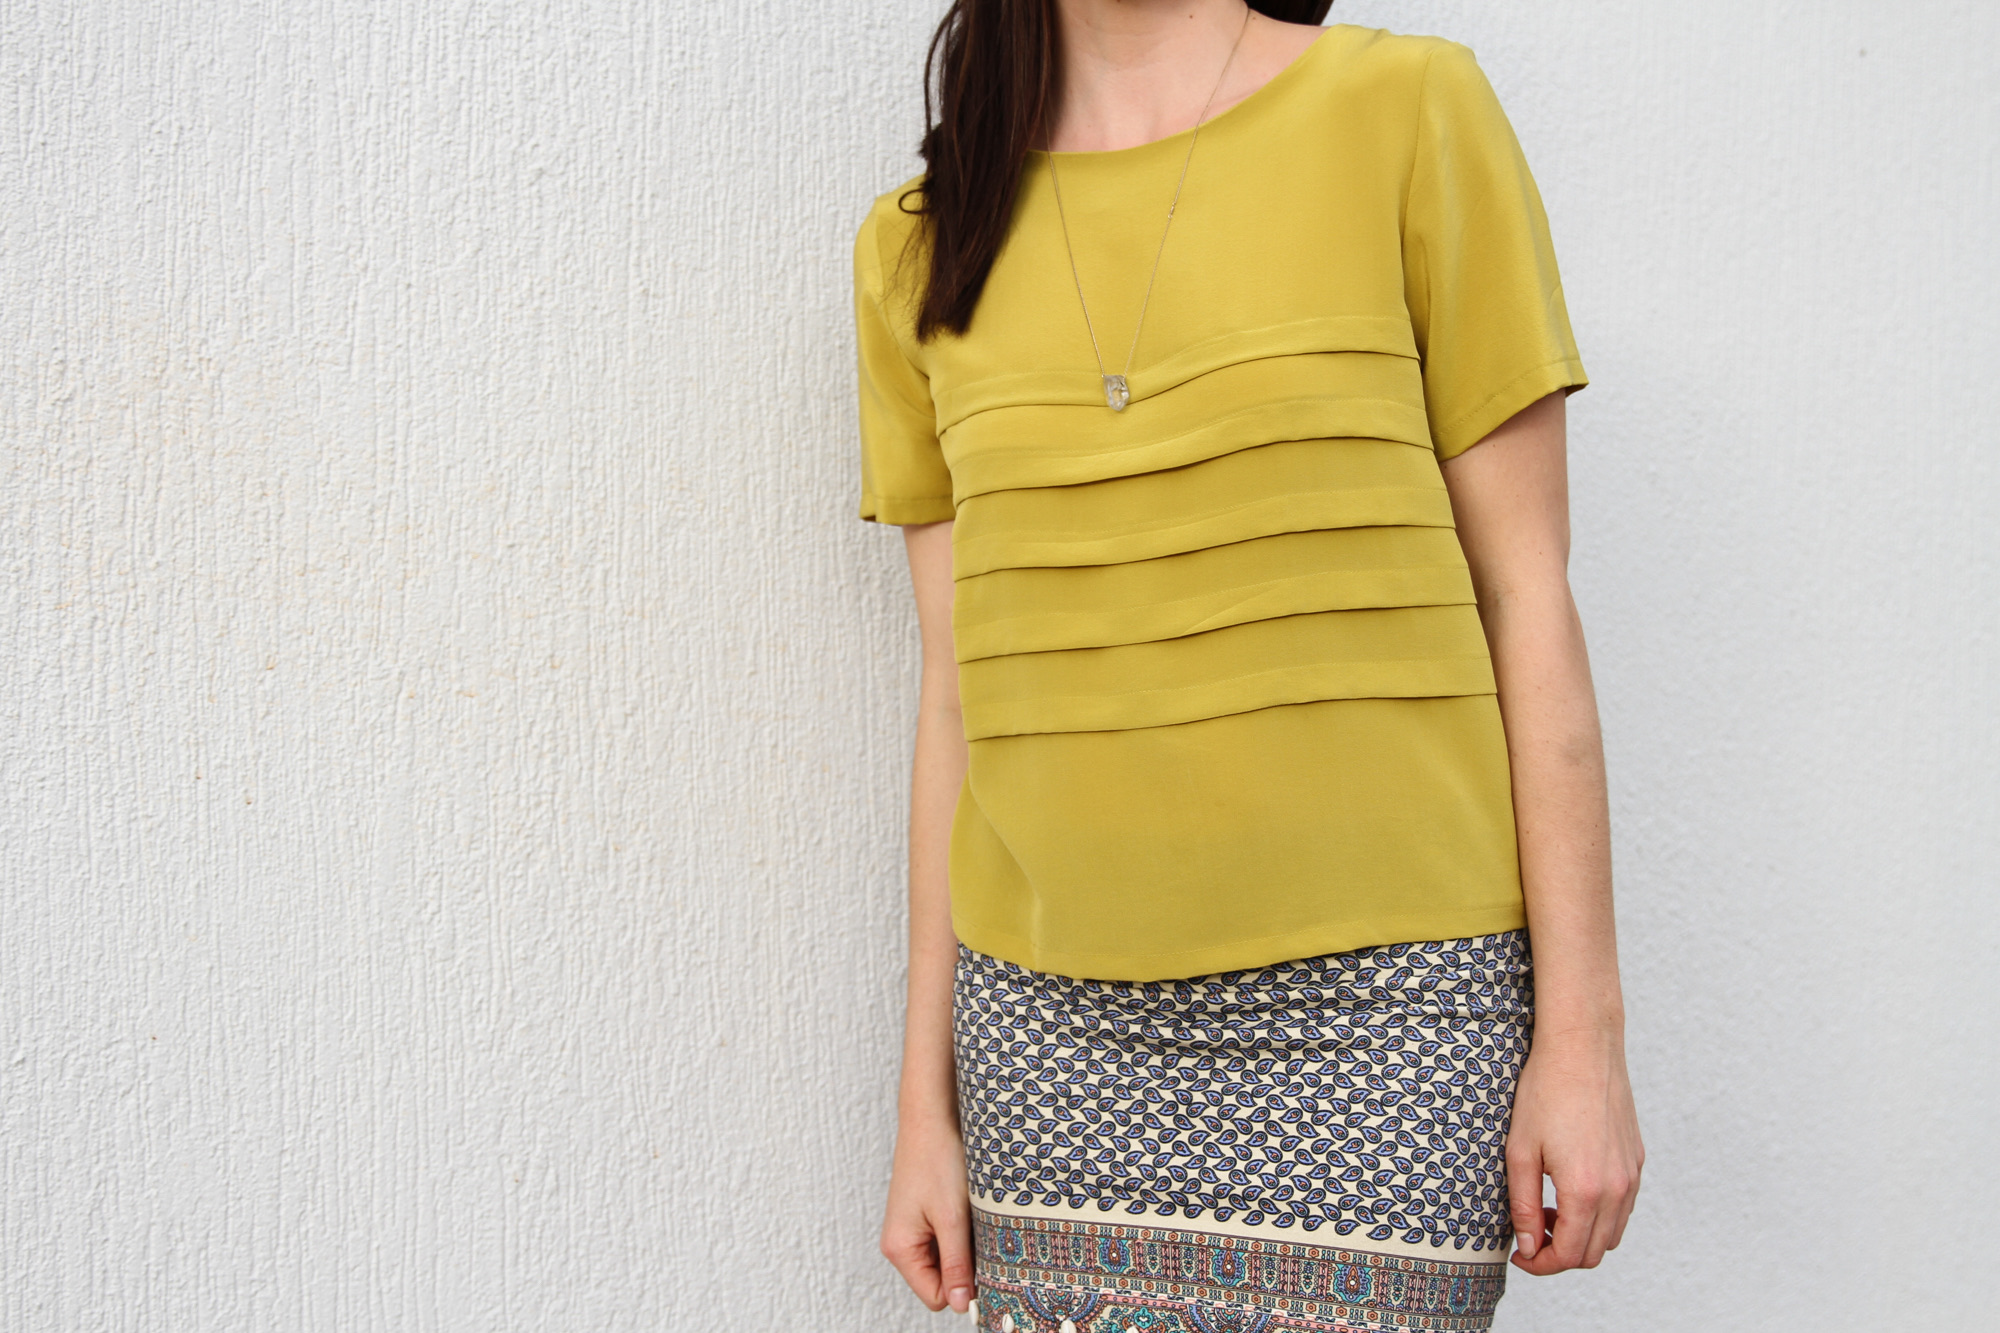


 Bloglovin
 Feedburner
 Feedly
 Kollabora
 In Your Inbox